
Sponsored
questionmillennium
Well-Known Member
- Joined
- May 20, 2025
- Threads
- 6
- Messages
- 113
- Reaction score
- 50
- Location
- Atlanta, GA
- Vehicles
- Cayenne E-Hybrid, Taycan 4S
Were you able to get 'Sports Plus' as well or was this just for the clock?
MrJones02
Well-Known Member
- Joined
- Feb 13, 2024
- Threads
- 0
- Messages
- 188
- Reaction score
- 187
- Location
- Germany
- Vehicles
- Taycan Turbo
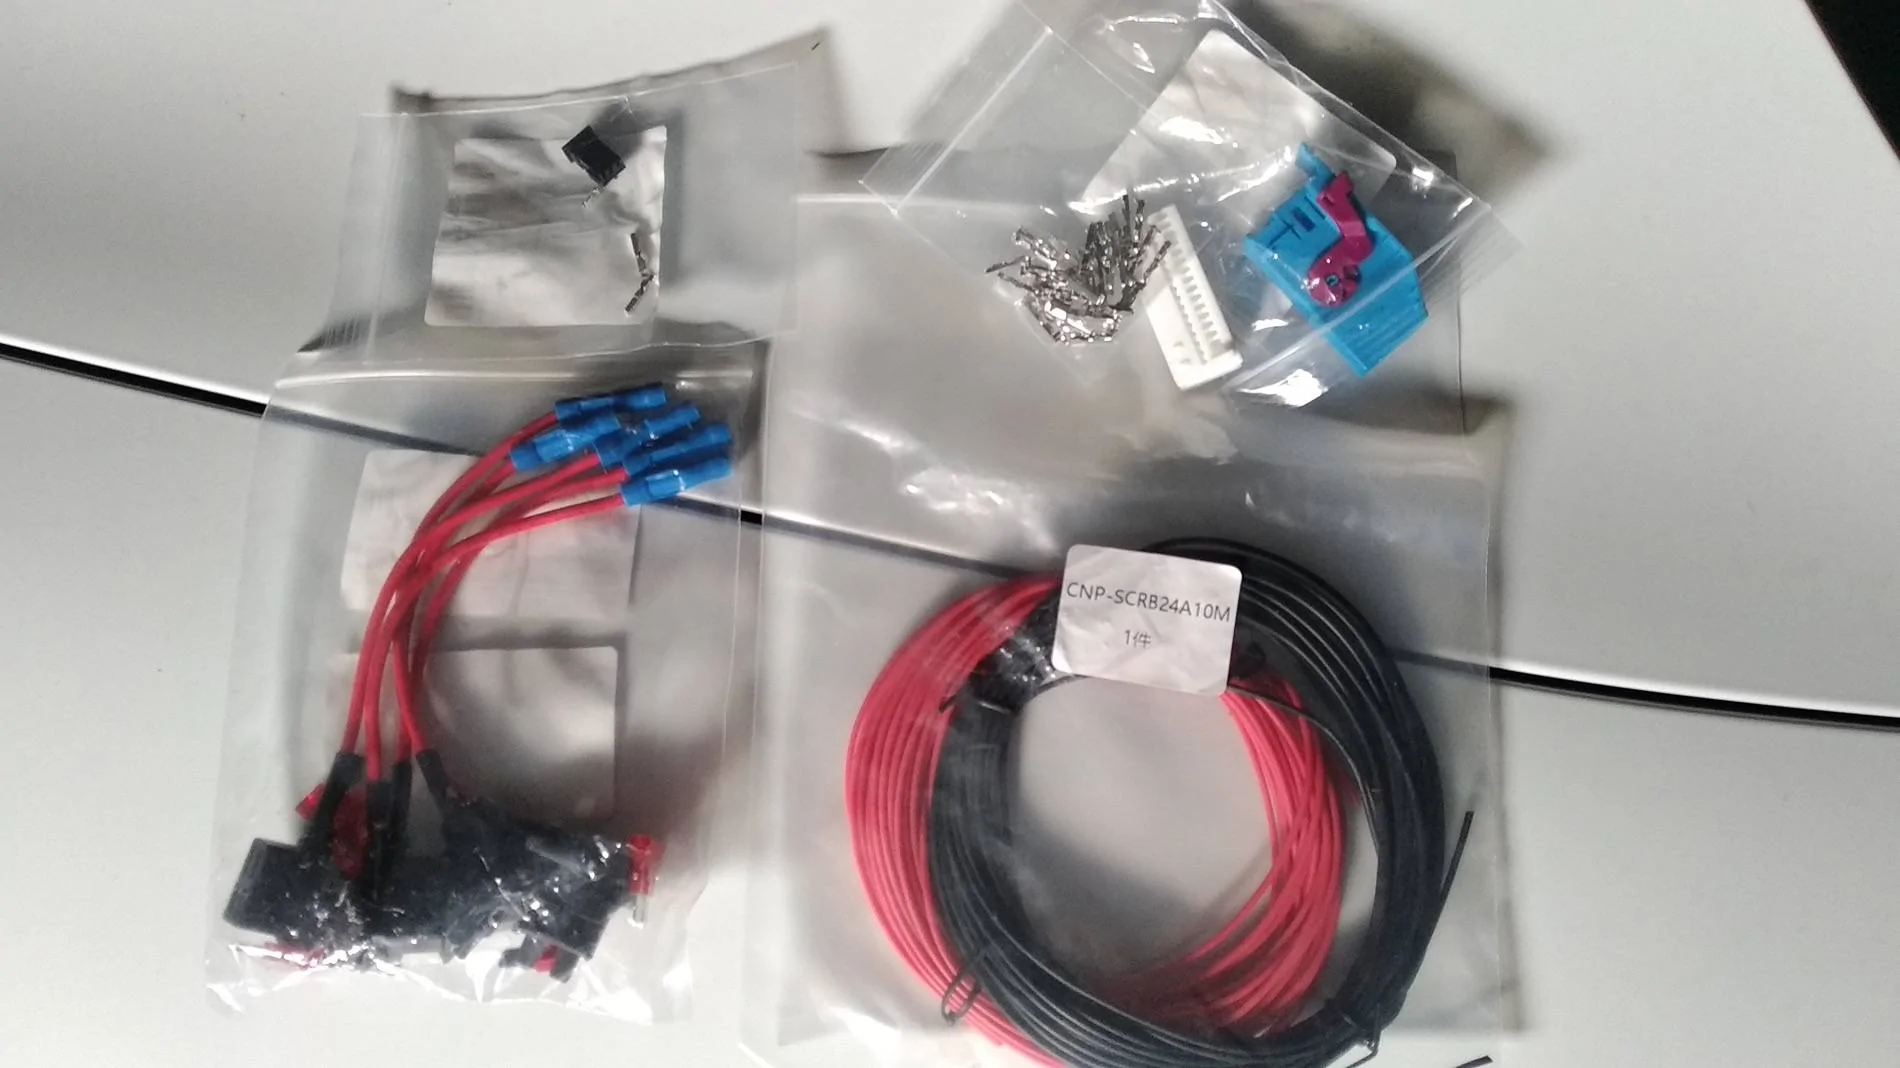
My parts from aliexpress came in today, all okay except the crimping tool was €3 junk (although it did its job eventually)Anyone have any pics/video on their outcome?
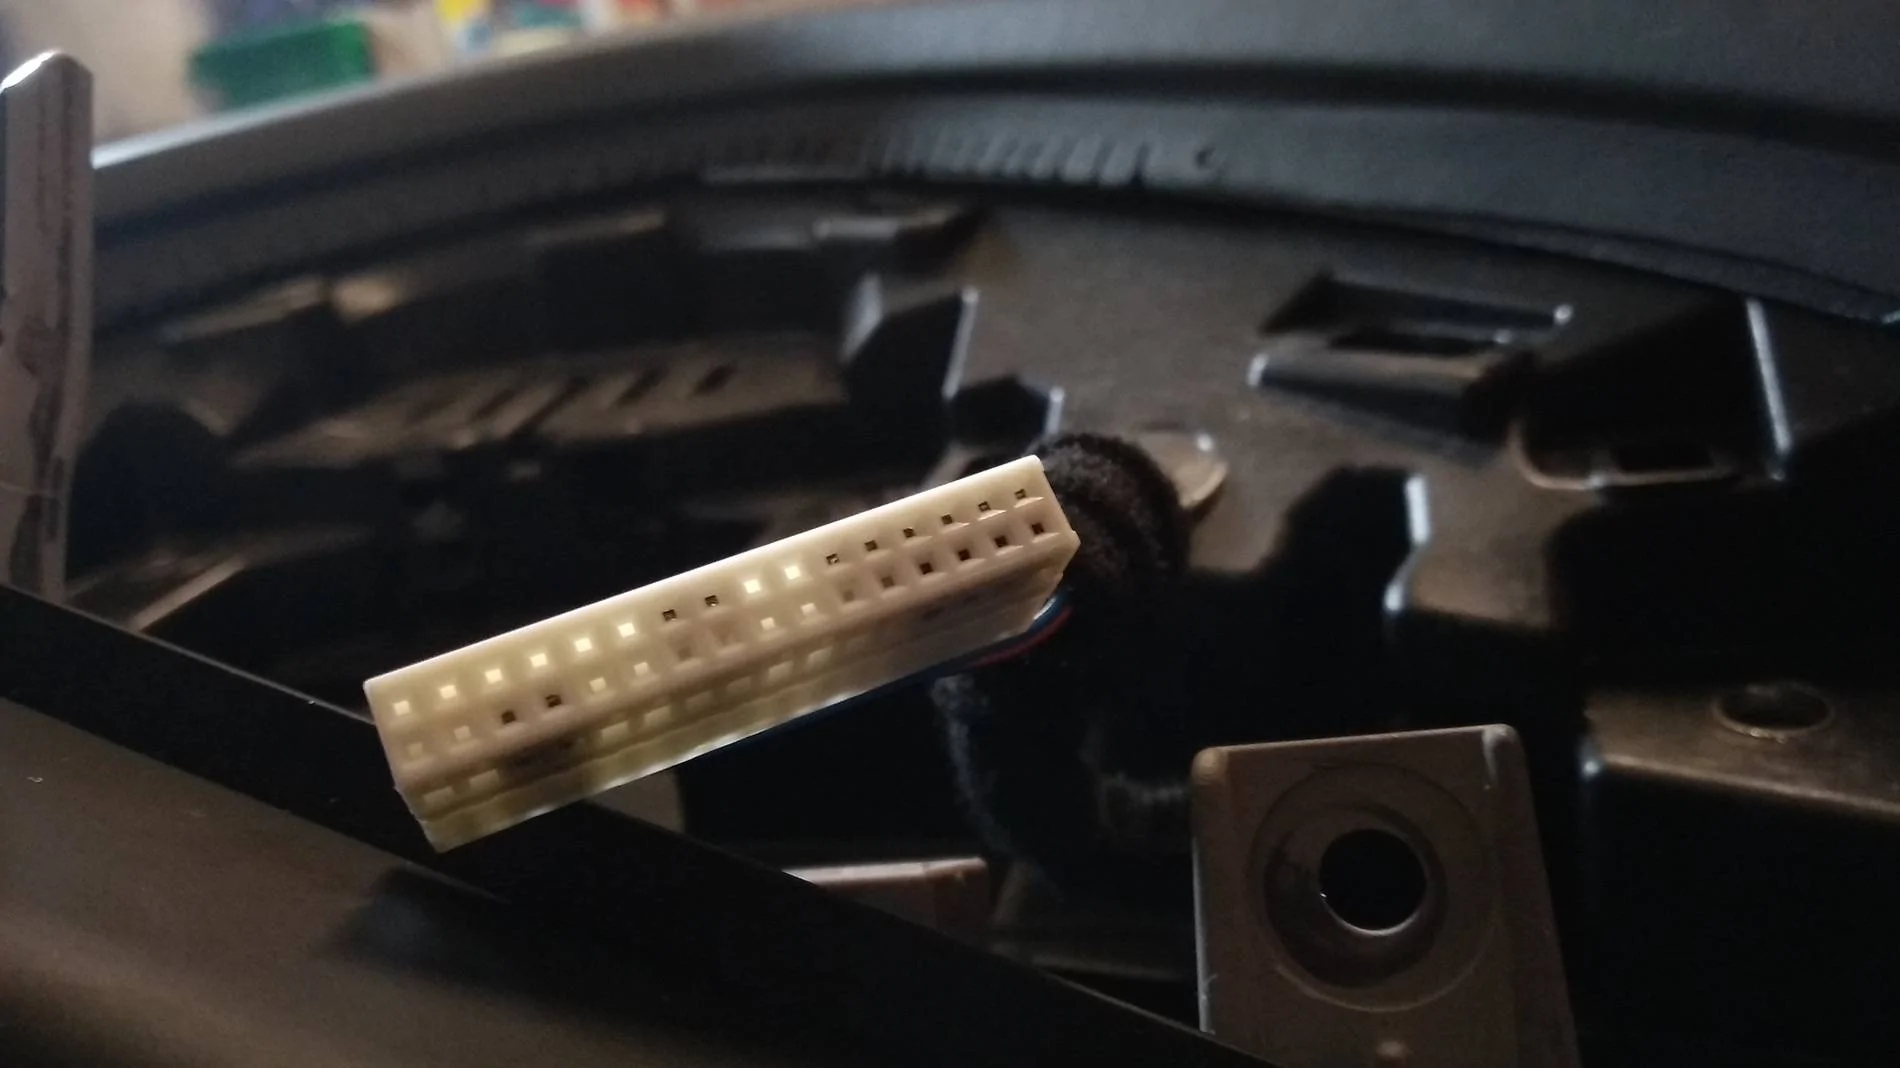
so that's the connector for the clock, a 32 pin connector with terminals (I used it to test my crimping skills and was happy to have extras when my crimp went wrong) ... if you are confident you only need one of those terminals to add to slot 17.
I took a slightly different approach than alex_bell as I didn't dare to splice into the existing wiring for 12v and ground, so got me some add-a-fuse.
Then some 24 AWG silicone wire (first ordered 18 AWG, but that was too thick to fit in the terminals and into the connector , beginners mistake, I'm not used to working with wiring)
Made the wire-loom as per directions in the first post
added pin 17 to the big white connector of the cluster, was the top left one (still empty in the pic)
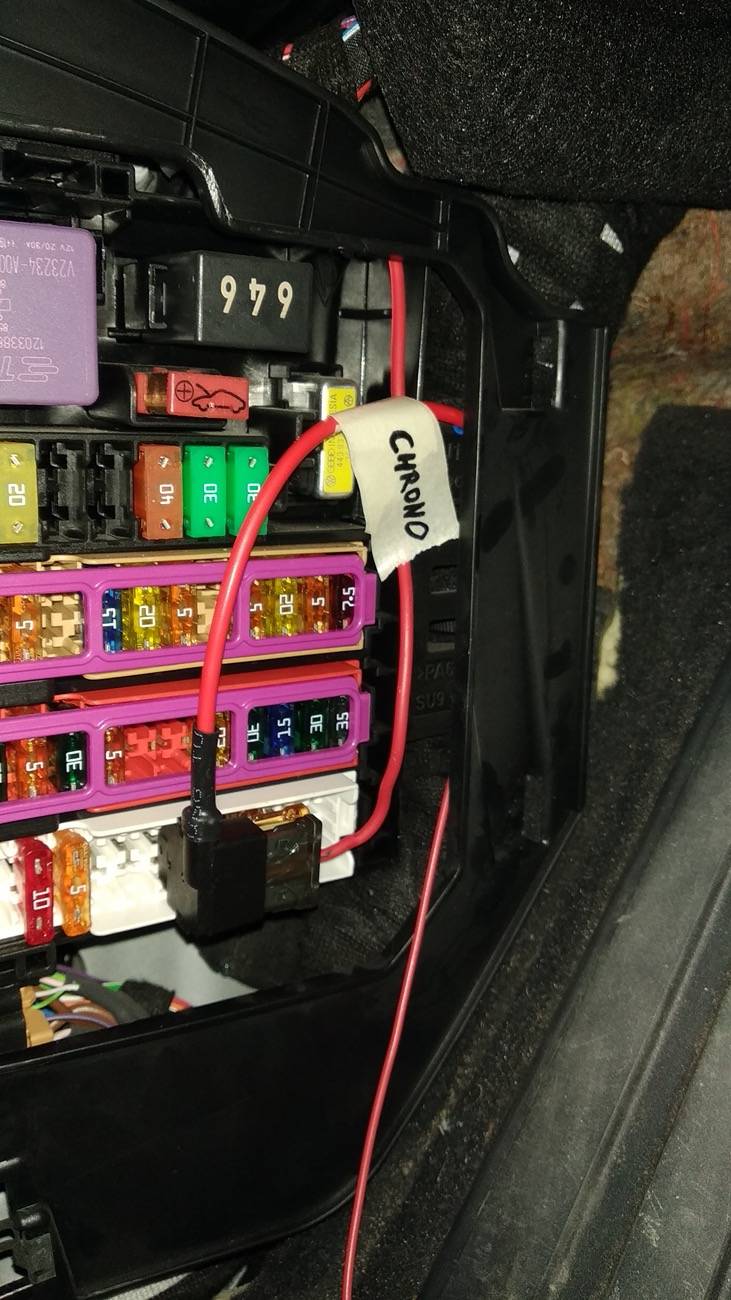
fishing some wire from the chrono to the instrument cluster area, then from there to the fuse box,
ground to the bolt near the fuse-box, red 12v to the add-a-fuse
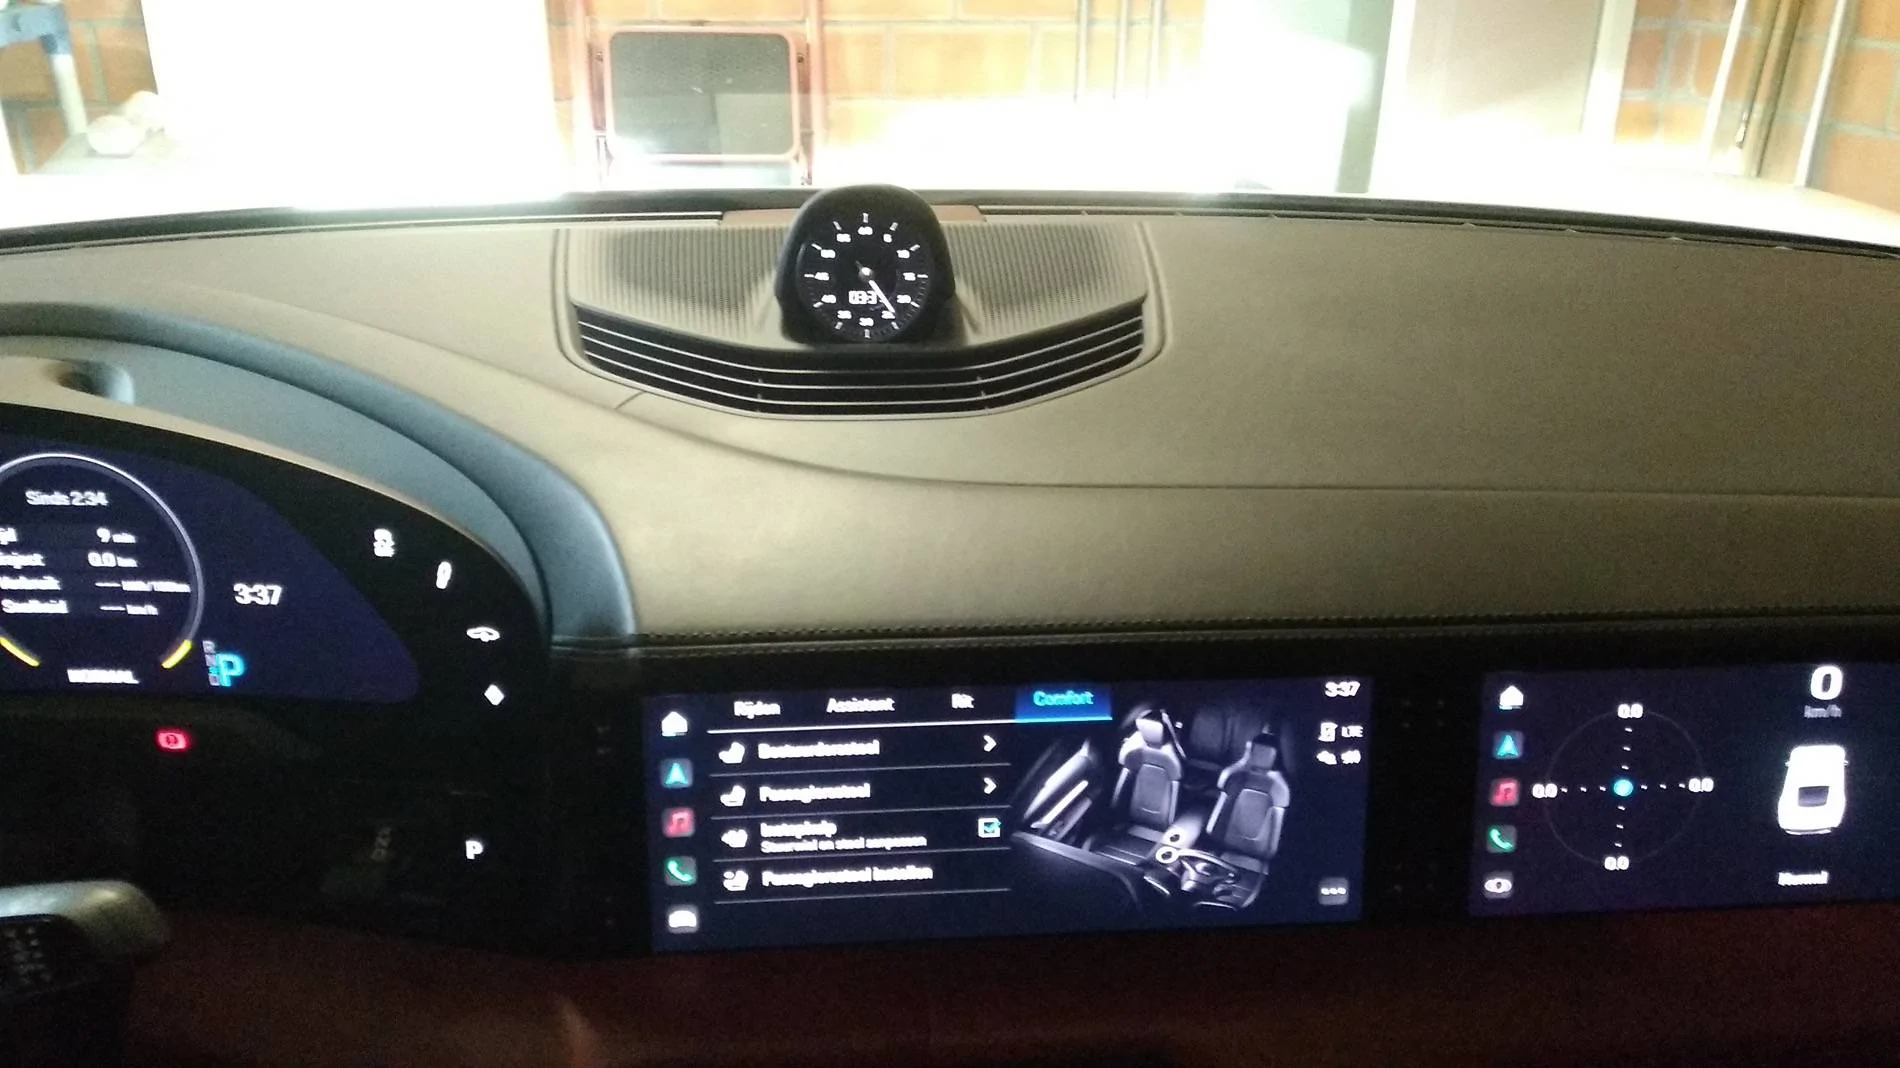
cleaned it all up, hopefully no rattles tomorrow
")
Great success! Completely useless and yet another place to read the time, but I like it.
I think it took about 4 hours, took my time ... always a good feeling to successfully complete a DIY project.
Many thanks to @alex_bell , wouldn't have attempted without your guide.
Last edited:
DeadEgg
New Member
- Joined
- Jul 5, 2023
- Threads
- 0
- Messages
- 2
- Reaction score
- 0
- Location
- San Diego
- Vehicles
- Taycan 4 Cross Turismo
Hi Alex,Hey folks. This weekends decided to retrofit sport chrono clock because my car came without it(and no sport chrono). I have that clock in my Panamera, so felt like something it missing, so here's short breakdown how I did it.
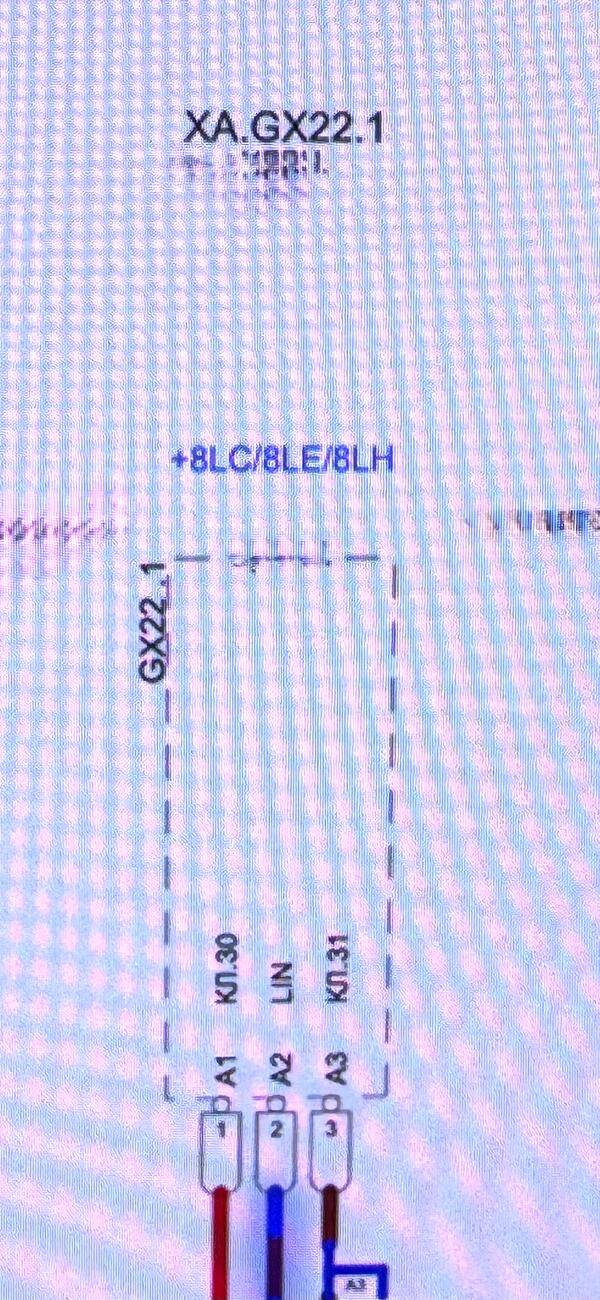
I bought used clock with backplate from local salvage yard for about $500, but I saw them also selling on eBay. I also made small wiring loom for 3 wires - Pos/Neg and LIN bus. You can use this PN 1C0973119B to get correct connector which will connect into clock, on eBay there are already with pins inside, or just add pins yourself.
Here's pinout of connector and how it looks


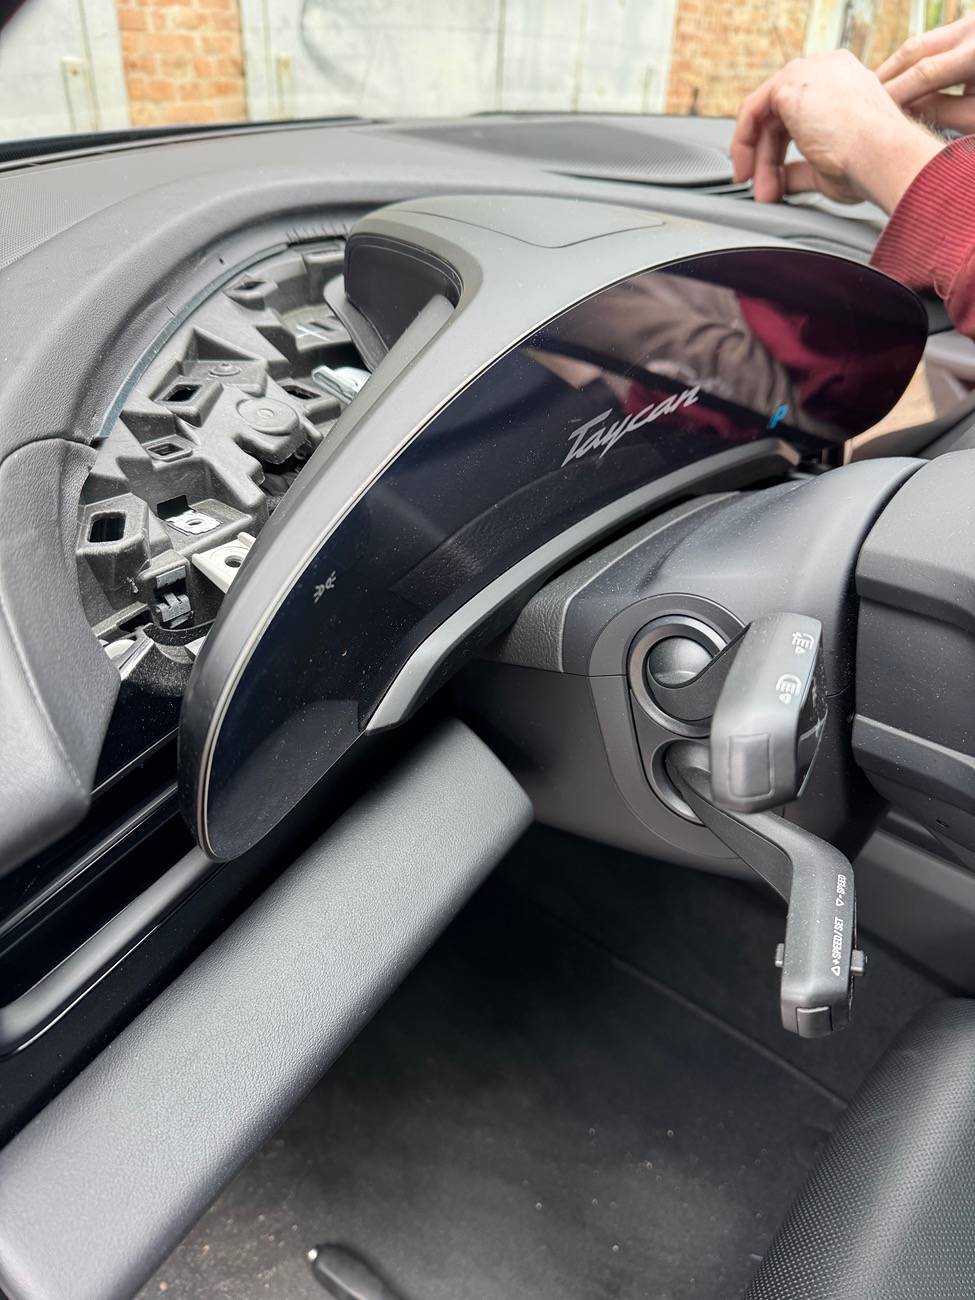
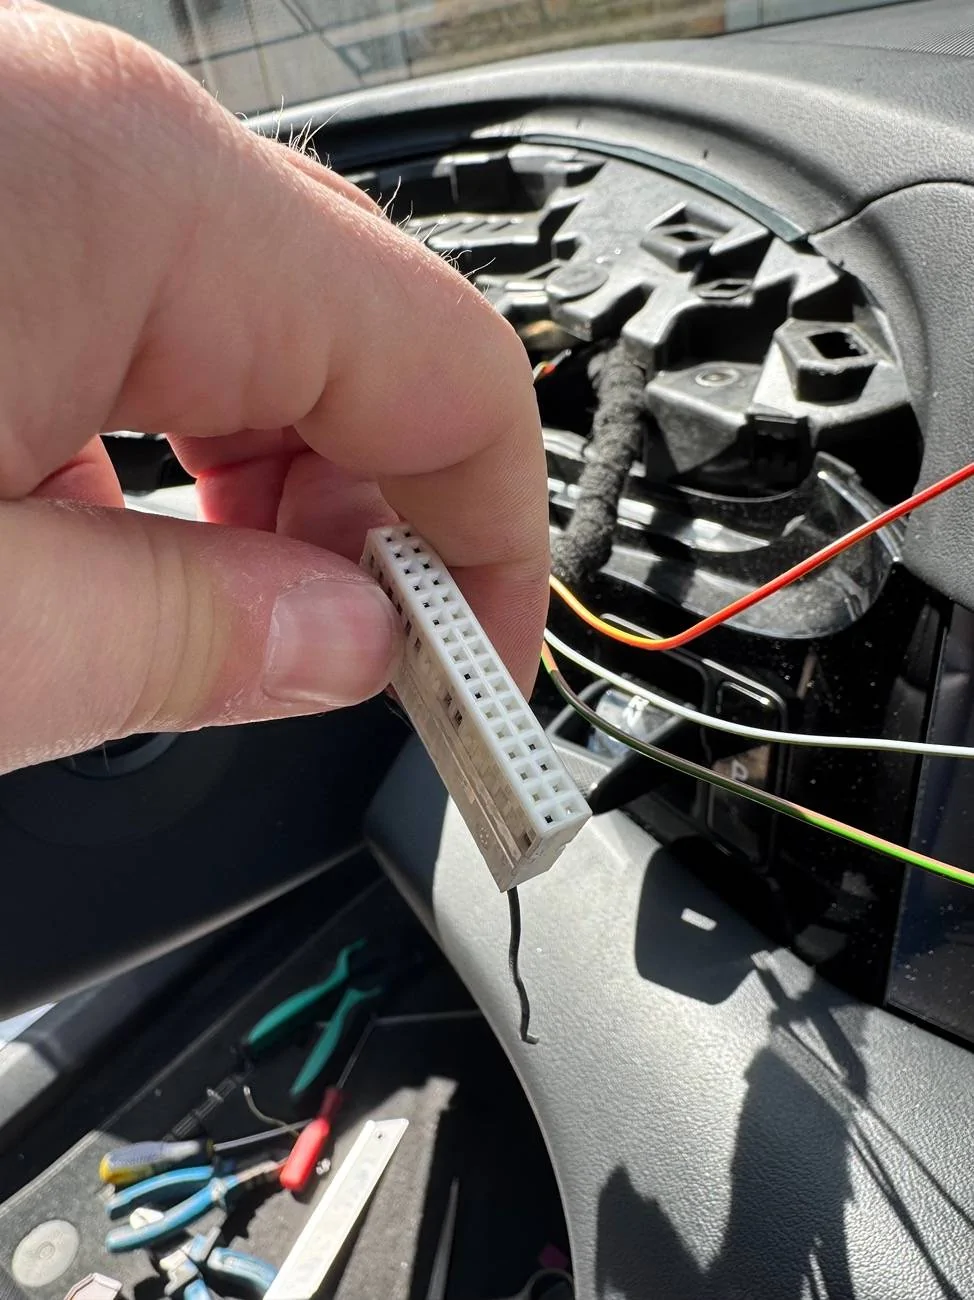
TO start I had to remove instrument cluster. To remove it you need to pop off plastic cover thats over IC and then unscrew 4 T20(or T25 dont remember) screws. Then IC simply pops off. Make sure car went to sleep so the screen isnt on anymore to prevent any damage when you disconnect it(it can take 5 mins to fully fall asleep sleep). Remove big connector first and then video signal
Remove video cable and big connector. Now we need to wire our clock to this connector. At first - remove housing, that purple small clip that holds connector in housing, just push it up and it will pop off. Next step - we need to add pin #17. This is where one of LIN bus wires lives and this bus made specifically to feed data to clock. The connector has 4 labels marking position of pins. The pin for #17 located in corner, but in my case connector didnt have pin, so I had to add one. You can use crimping tool to make it, but I didnt have this small pins, so I just found old wiring loom from VW and pulled one of pins from that loom and it fit perfectly

Next step - remove central speaker cover. Just use pry tool and pry it up. Remove speaker for some time, so it'd be easier to work.
At first I routed wires through hole near air vent channel, but I didnt like that I could see it when I'd put speaker cover back, so I drilled tiny hole behind air vent like 5mm diameter and routed wires there. Took a bit of back and forth, few wires to get it in a route I wanted, but eventually got it done
Last step - add power and ground. You can use any red wire on connector for +12v and any brown wire for ground. In my case I used PIN 31 for +12v and pin 30 for ground. Simply cut isolation off, soldered and put isolation tape back.
Now it's basically done. I insulated with same isolation tape as rest of the loom, so in my case it looks like its been factory made. Connect clock, connect instrument cluster(video signal first, then big connector) and turn car on. You should have your time reset, so go to PCM and set it again. The clock should synchronize with car time right away.
Basic clock feature does not need any coding and works right after connecting. In my case it worked right away. Clock arrow works well, backlight also works well(the one that lights up numbers). If you wan it to be a timer, you will need to code it to car, but I'll do that sometime later when I find reasonable priced steering wheel with mode selector and add full Chrono sport to car.
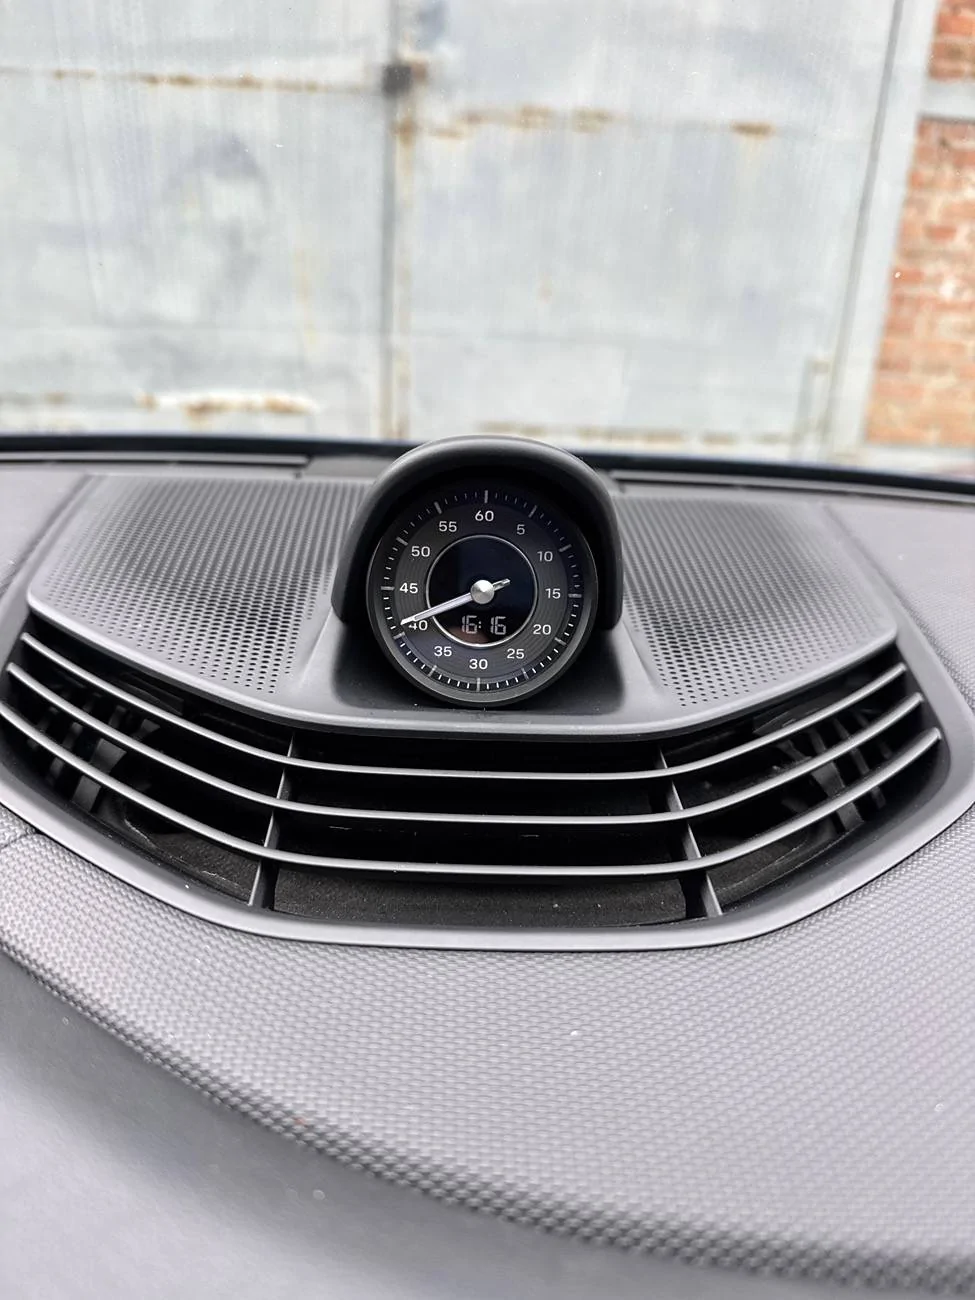
This is how it looks now
I hope it will help someone to retrofit it too. It took me about 3-4 hours in total with few coffee breaks.
Recently I also replaced CCS1 to CCS2 ports, so if anyone is interested - I can write brief explanation what needs for that
PS: Apologize for any mistakes or typos, I'm not native English speaker, but tried my best

This is amazing and thank you so much for sharing!
Do you happen to have all the part numbers for the sport chrono clock setup you got there?
Thanks!
alex_bell
Well-Known Member
- First Name
- Alex
- Joined
- May 8, 2025
- Threads
- 3
- Messages
- 55
- Reaction score
- 53
- Location
- Vancouver
- Vehicles
- Taycan 4s
- Thread starter
- #21
Hi, not really. Haven't done any photos. I got it from salvage yard as a whole piece - clock and platform. Its probably pointless to buy them new, super expensiveHi Alex,
This is amazing and thank you so much for sharing!
Do you happen to have all the part numbers for the sport chrono clock setup you got there?
Thanks!
alex_bell
Well-Known Member
- First Name
- Alex
- Joined
- May 8, 2025
- Threads
- 3
- Messages
- 55
- Reaction score
- 53
- Location
- Vancouver
- Vehicles
- Taycan 4s
- Thread starter
- #22
Wow thats so cool, glad you made it mate!My parts from aliexpress came in today, all okay except the crimping tool was €3 junk (although it did its job eventually)

so that's the connector for the clock, a 32 pin connector with terminals (I used it to test my crimping skills and was happy to have extras when my crimp went wrong) ... if you are confident you only need one of those terminals to add to slot 17.
I took a slightly different approach than alex_bell as I didn't dare to splice into the existing wiring for 12v and ground, so got me some add-a-fuse.
Then some 24 AWG silicone wire (first ordered 18 AWG, but that was too thick to fit in the terminals and into the connector , beginners mistake, I'm not used to working with wiring)
Made the wire-loom as per directions in the first post
added pin 17 to the big white connector of the cluster, was the top left one (still empty in the pic)
fishing some wire from the chrono to the instrument cluster area, then from there to the fuse box,
ground to the bolt near the fuse-box, red 12v to the add-a-fuse

cleaned it all up, hopefully no rattles tomorrow
Great success! Completely useless and yet another place to read the time, but I like it.
I think it took about 4 hours, took my time ... always a good feeling to successfully complete a DIY project.
Many thanks to @alex_bell , wouldn't have attempted without your guide.
Curious why you decided to tap into fuse box for power instead of taking it from instrument cluster? Would be so much easier
MrJones02
Well-Known Member
- Joined
- Feb 13, 2024
- Threads
- 0
- Messages
- 188
- Reaction score
- 187
- Location
- Germany
- Vehicles
- Taycan Turbo
That's just me being overly worried I'd somehow screw up the original wiresCurious why you decided to tap into fuse box for power instead of taking it from instrument cluster? Would be so much easier
Taking power from the instrument cluster would indeed have been better.
frietzak
Well-Known Member
How much did you pay for the chrono and dashboard part?That's just me being overly worried I'd somehow screw up the original wires
Taking power from the instrument cluster would indeed have been better.
MrJones02
Well-Known Member
- Joined
- Feb 13, 2024
- Threads
- 0
- Messages
- 188
- Reaction score
- 187
- Location
- Germany
- Vehicles
- Taycan Turbo
I was very lucky and got everything I needed for just under €180 (original parts, no aftermarket)How much did you pay for the chrono and dashboard part?
Normal prices are more like 400-450. (undamaged/new condition, you dont want one with scratches).
Make sure you get the correct color-version for your dashboard trim, you got black, slate grey, blue etc.
These parts will also fit the new/current taycans that still come without sport chrono being standard (4S and lower), so I'd say these parts will stay in demand for a long time. If you were to sell them again by the time you plan on selling your Taycan, you probably won't lose much if any on it. (that was my man-maths
)frietzak
Well-Known Member
Do you perhaps have the part numbers?I was very lucky and got everything I needed for just under €180 (original parts, no aftermarket)
Normal prices are more like 400-450. (undamaged/new condition, you dont want one with scratches).
Make sure you get the correct color-version for your dashboard trim, you got black, slate grey, blue etc.
These parts will also fit the new/current taycans that still come without sport chrono being standard (4S and lower), so I'd say these parts will stay in demand for a long time. If you were to sell them again by the time you plan on selling your Taycan, you probably won't lose much if any on it. (that was my man-maths
MrJones02
Well-Known Member
- Joined
- Feb 13, 2024
- Threads
- 0
- Messages
- 188
- Reaction score
- 187
- Location
- Germany
- Vehicles
- Taycan Turbo
what it says on mine:Do you perhaps have the part numbers?
Trim: 9J1.858.189.C. (if you were to buy it new, note the trim is 2 pieces, the base and that round cover that goes over the clock)
Clock: 9J1.919.203.J (there are more variations that will fit, the Porsche Design version for example is typically more expensive/harder to find)
fika
Well-Known Member
- First Name
- Jared
- Joined
- Jul 10, 2023
- Threads
- 0
- Messages
- 56
- Reaction score
- 41
- Location
- Los Angeles
- Vehicles
- 2020 Taycan Turbo
nice writeup! I guess I'm the only one that doesn't like mine, I did the opposite
pjrezai
Member
HI! I just joined the Taycan community today!! I actually was looking to do this purely out of aesthetics where I wouldn't even wire it for now until a later date I will have the time and courage to wire it. Is just replacing it, nonworking, purely popping the top vent dashboard plastic piece of and popping this in?Hey folks. This weekends decided to retrofit sport chrono clock because my car came without it(and no sport chrono). I have that clock in my Panamera, so felt like something it missing, so here's short breakdown how I did it.
I bought used clock with backplate from local salvage yard for about $500, but I saw them also selling on eBay. I also made small wiring loom for 3 wires - Pos/Neg and LIN bus. You can use this PN 1C0973119B to get correct connector which will connect into clock, on eBay there are already with pins inside, or just add pins yourself.
Here's pinout of connector and how it looks
TO start I had to remove instrument cluster. To remove it you need to pop off plastic cover thats over IC and then unscrew 4 T20(or T25 dont remember) screws. Then IC simply pops off. Make sure car went to sleep so the screen isnt on anymore to prevent any damage when you disconnect it(it can take 5 mins to fully fall asleep sleep). Remove big connector first and then video signal
Remove video cable and big connector. Now we need to wire our clock to this connector. At first - remove housing, that purple small clip that holds connector in housing, just push it up and it will pop off. Next step - we need to add pin #17. This is where one of LIN bus wires lives and this bus made specifically to feed data to clock. The connector has 4 labels marking position of pins. The pin for #17 located in corner, but in my case connector didnt have pin, so I had to add one. You can use crimping tool to make it, but I didnt have this small pins, so I just found old wiring loom from VW and pulled one of pins from that loom and it fit perfectly
Next step - remove central speaker cover. Just use pry tool and pry it up. Remove speaker for some time, so it'd be easier to work.
At first I routed wires through hole near air vent channel, but I didnt like that I could see it when I'd put speaker cover back, so I drilled tiny hole behind air vent like 5mm diameter and routed wires there. Took a bit of back and forth, few wires to get it in a route I wanted, but eventually got it done
Last step - add power and ground. You can use any red wire on connector for +12v and any brown wire for ground. In my case I used PIN 31 for +12v and pin 30 for ground. Simply cut isolation off, soldered and put isolation tape back.
Now it's basically done. I insulated with same isolation tape as rest of the loom, so in my case it looks like its been factory made. Connect clock, connect instrument cluster(video signal first, then big connector) and turn car on. You should have your time reset, so go to PCM and set it again. The clock should synchronize with car time right away.
Basic clock feature does not need any coding and works right after connecting. In my case it worked right away. Clock arrow works well, backlight also works well(the one that lights up numbers). If you wan it to be a timer, you will need to code it to car, but I'll do that sometime later when I find reasonable priced steering wheel with mode selector and add full Chrono sport to car.
This is how it looks now
I hope it will help someone to retrofit it too. It took me about 3-4 hours in total with few coffee breaks.
Recently I also replaced CCS1 to CCS2 ports, so if anyone is interested - I can write brief explanation what needs for that
PS: Apologize for any mistakes or typos, I'm not native English speaker, but tried my best
pjrezai
Member
interesting? Why was that?nice writeup! I guess I'm the only one that doesn't like mine, I did the opposite
Sponsored