Clear Side Markers

BROUbrou09

Active Member
Joined
Jun 24, 2021
Threads
1
Messages
37
Reaction score
58
Location
Tennessee
Vehicles
Taycan Cross Turismo 4S, Audi e-tron
Country flag
T20. I was using it on a screwdriver style handle, making it hard to keep a straight angle. Will try a ratchet later today
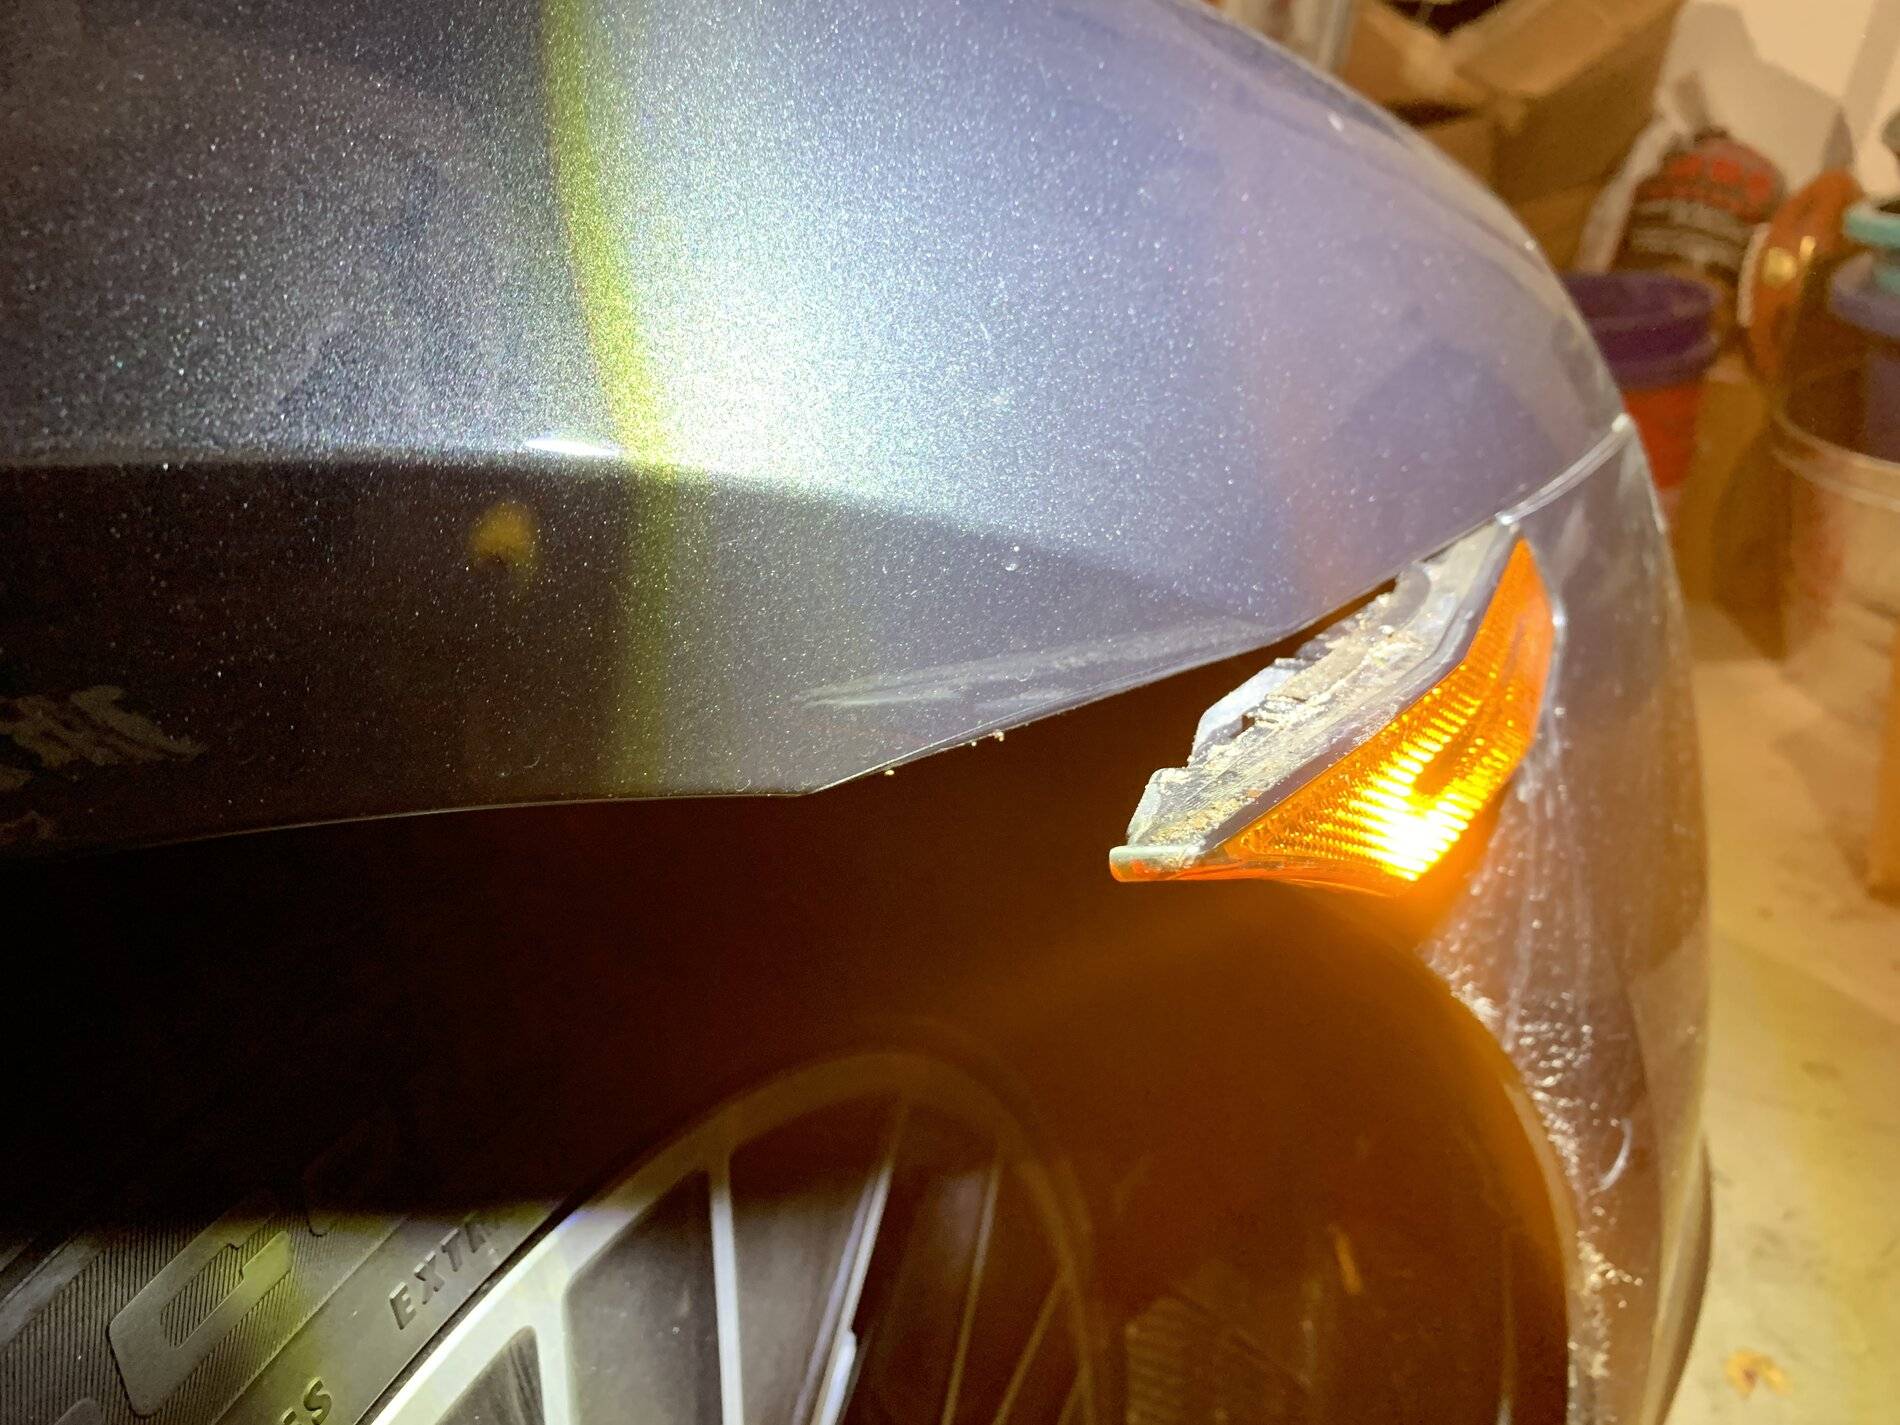
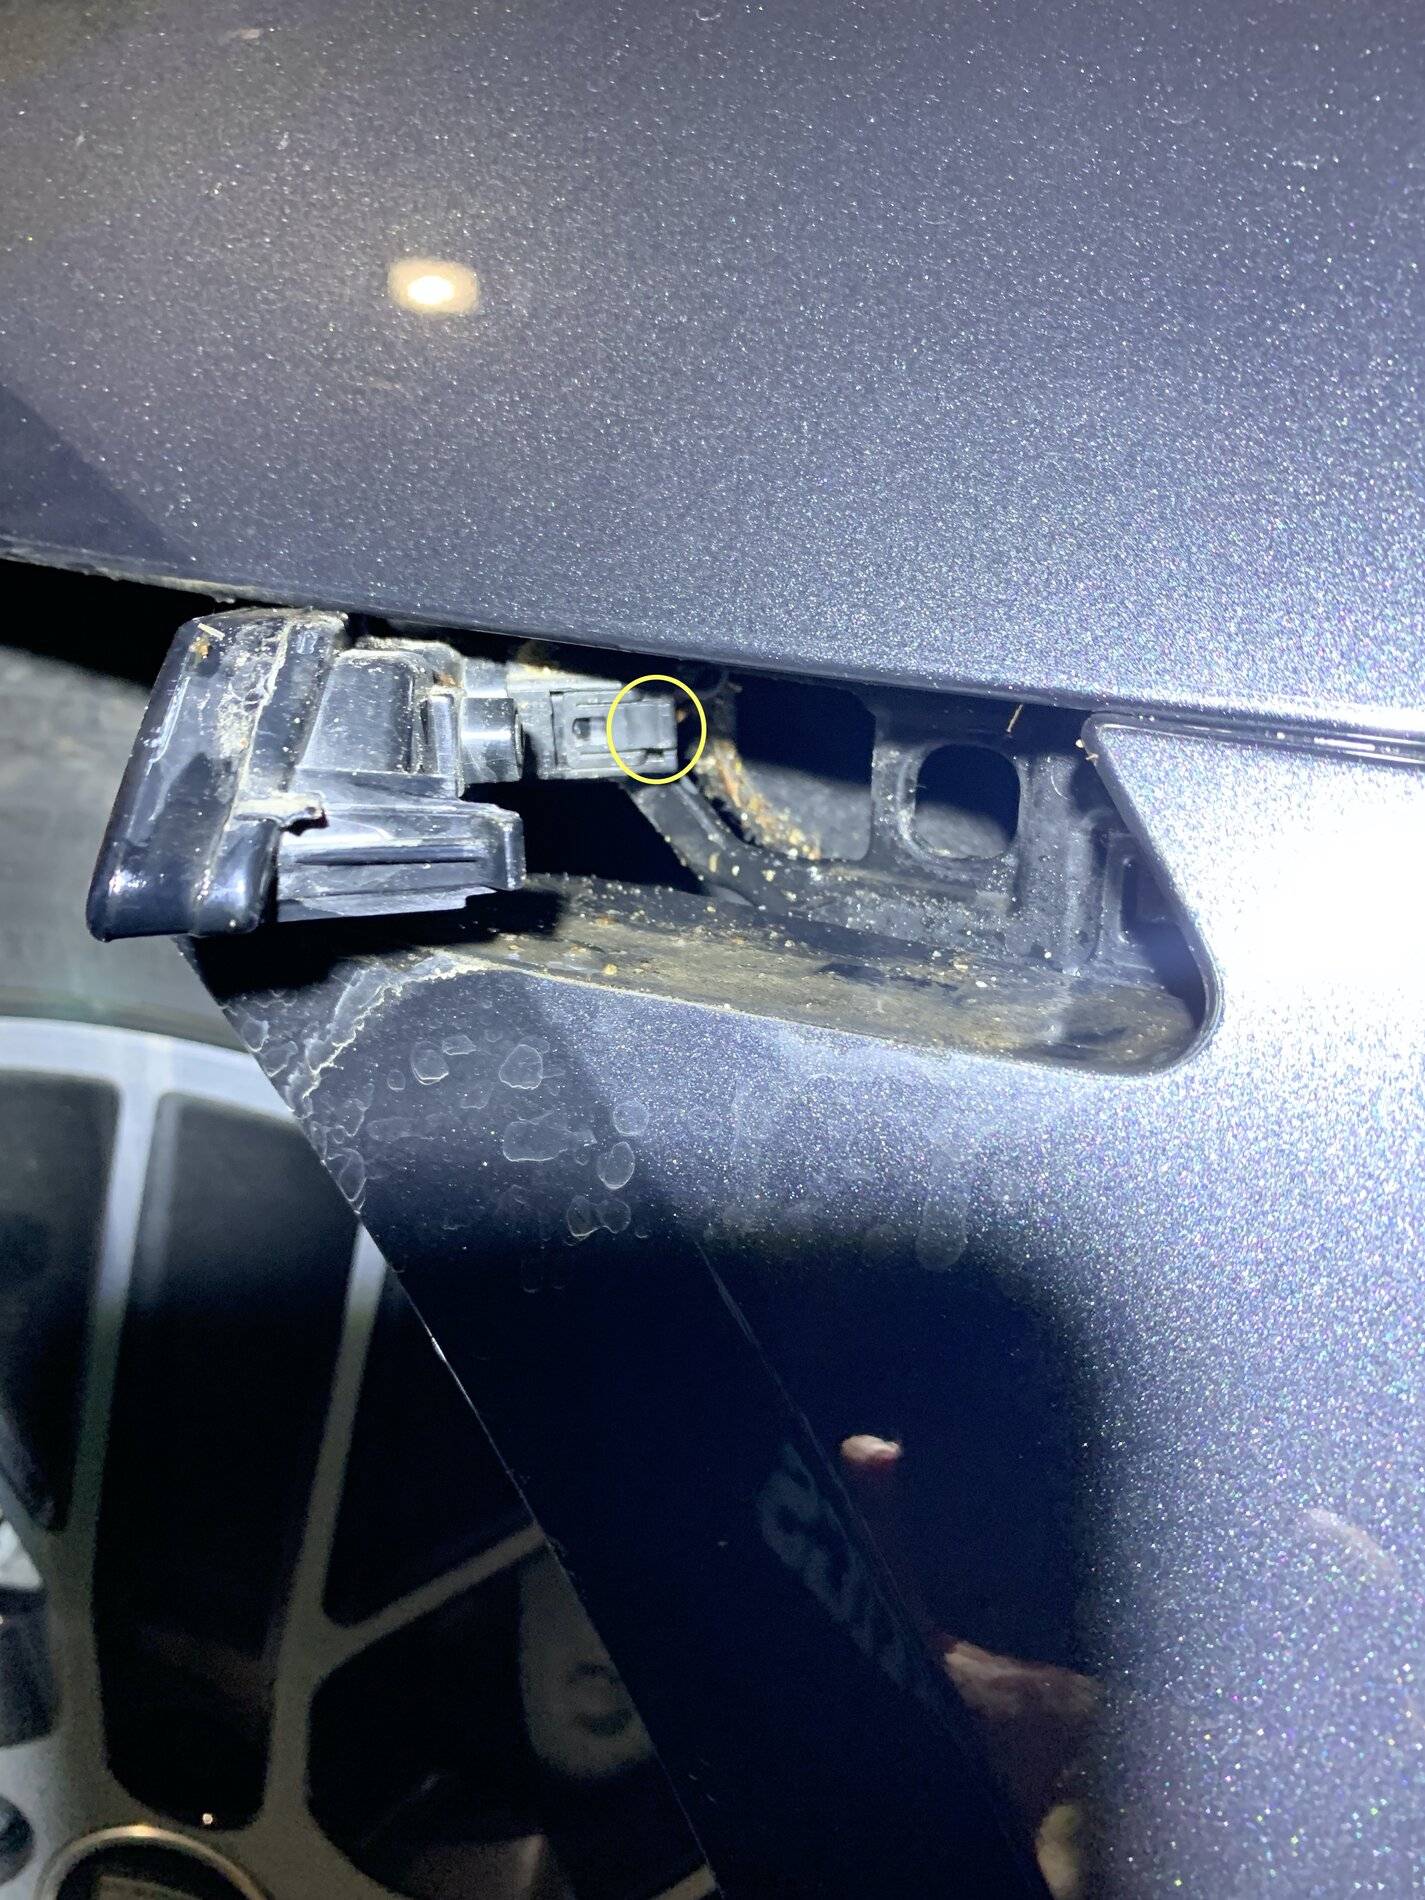
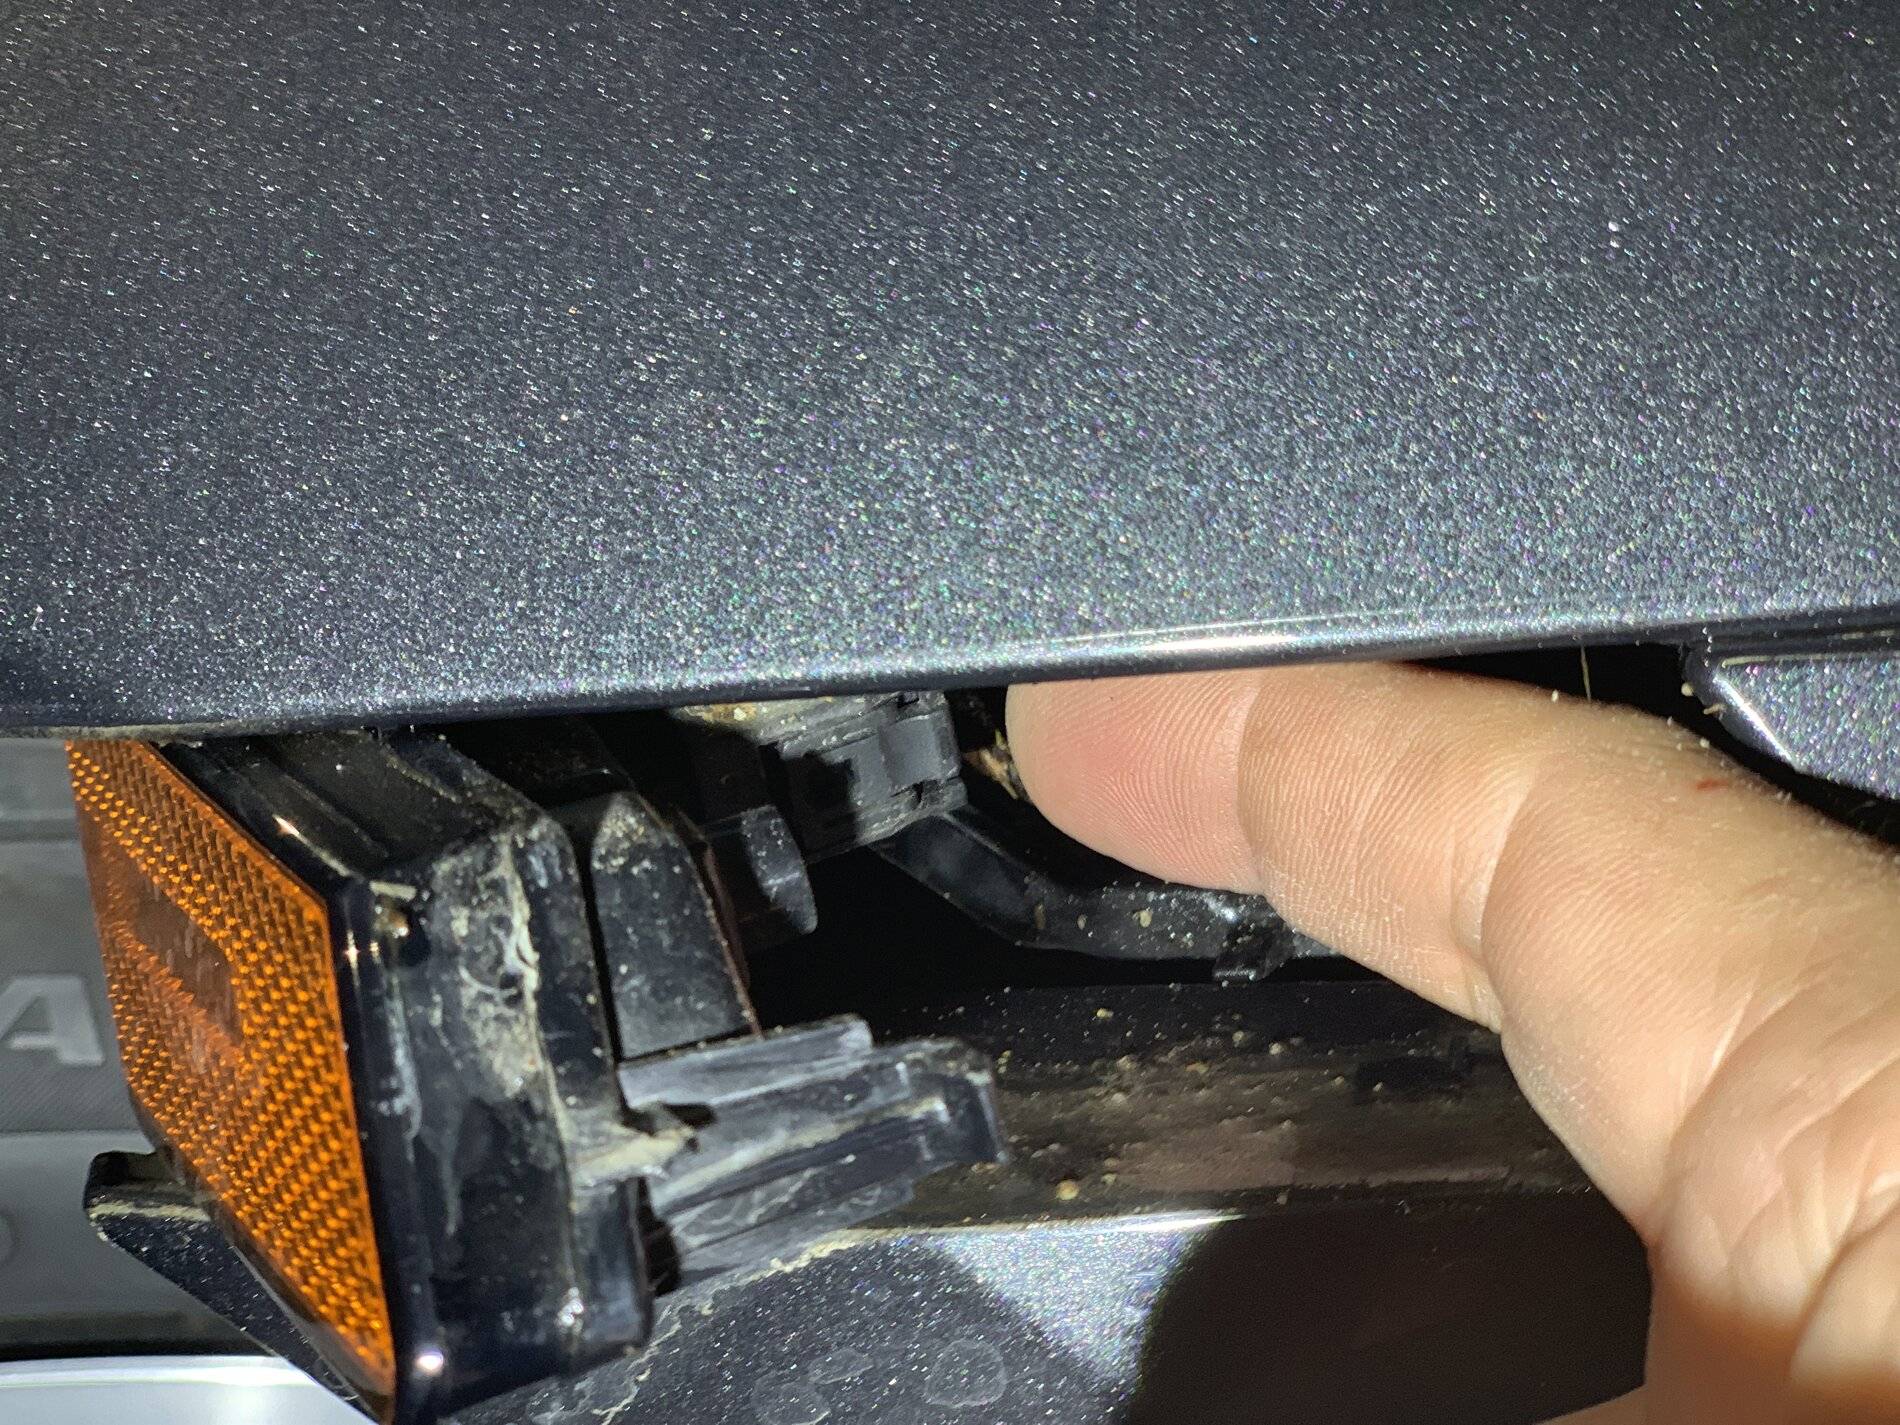
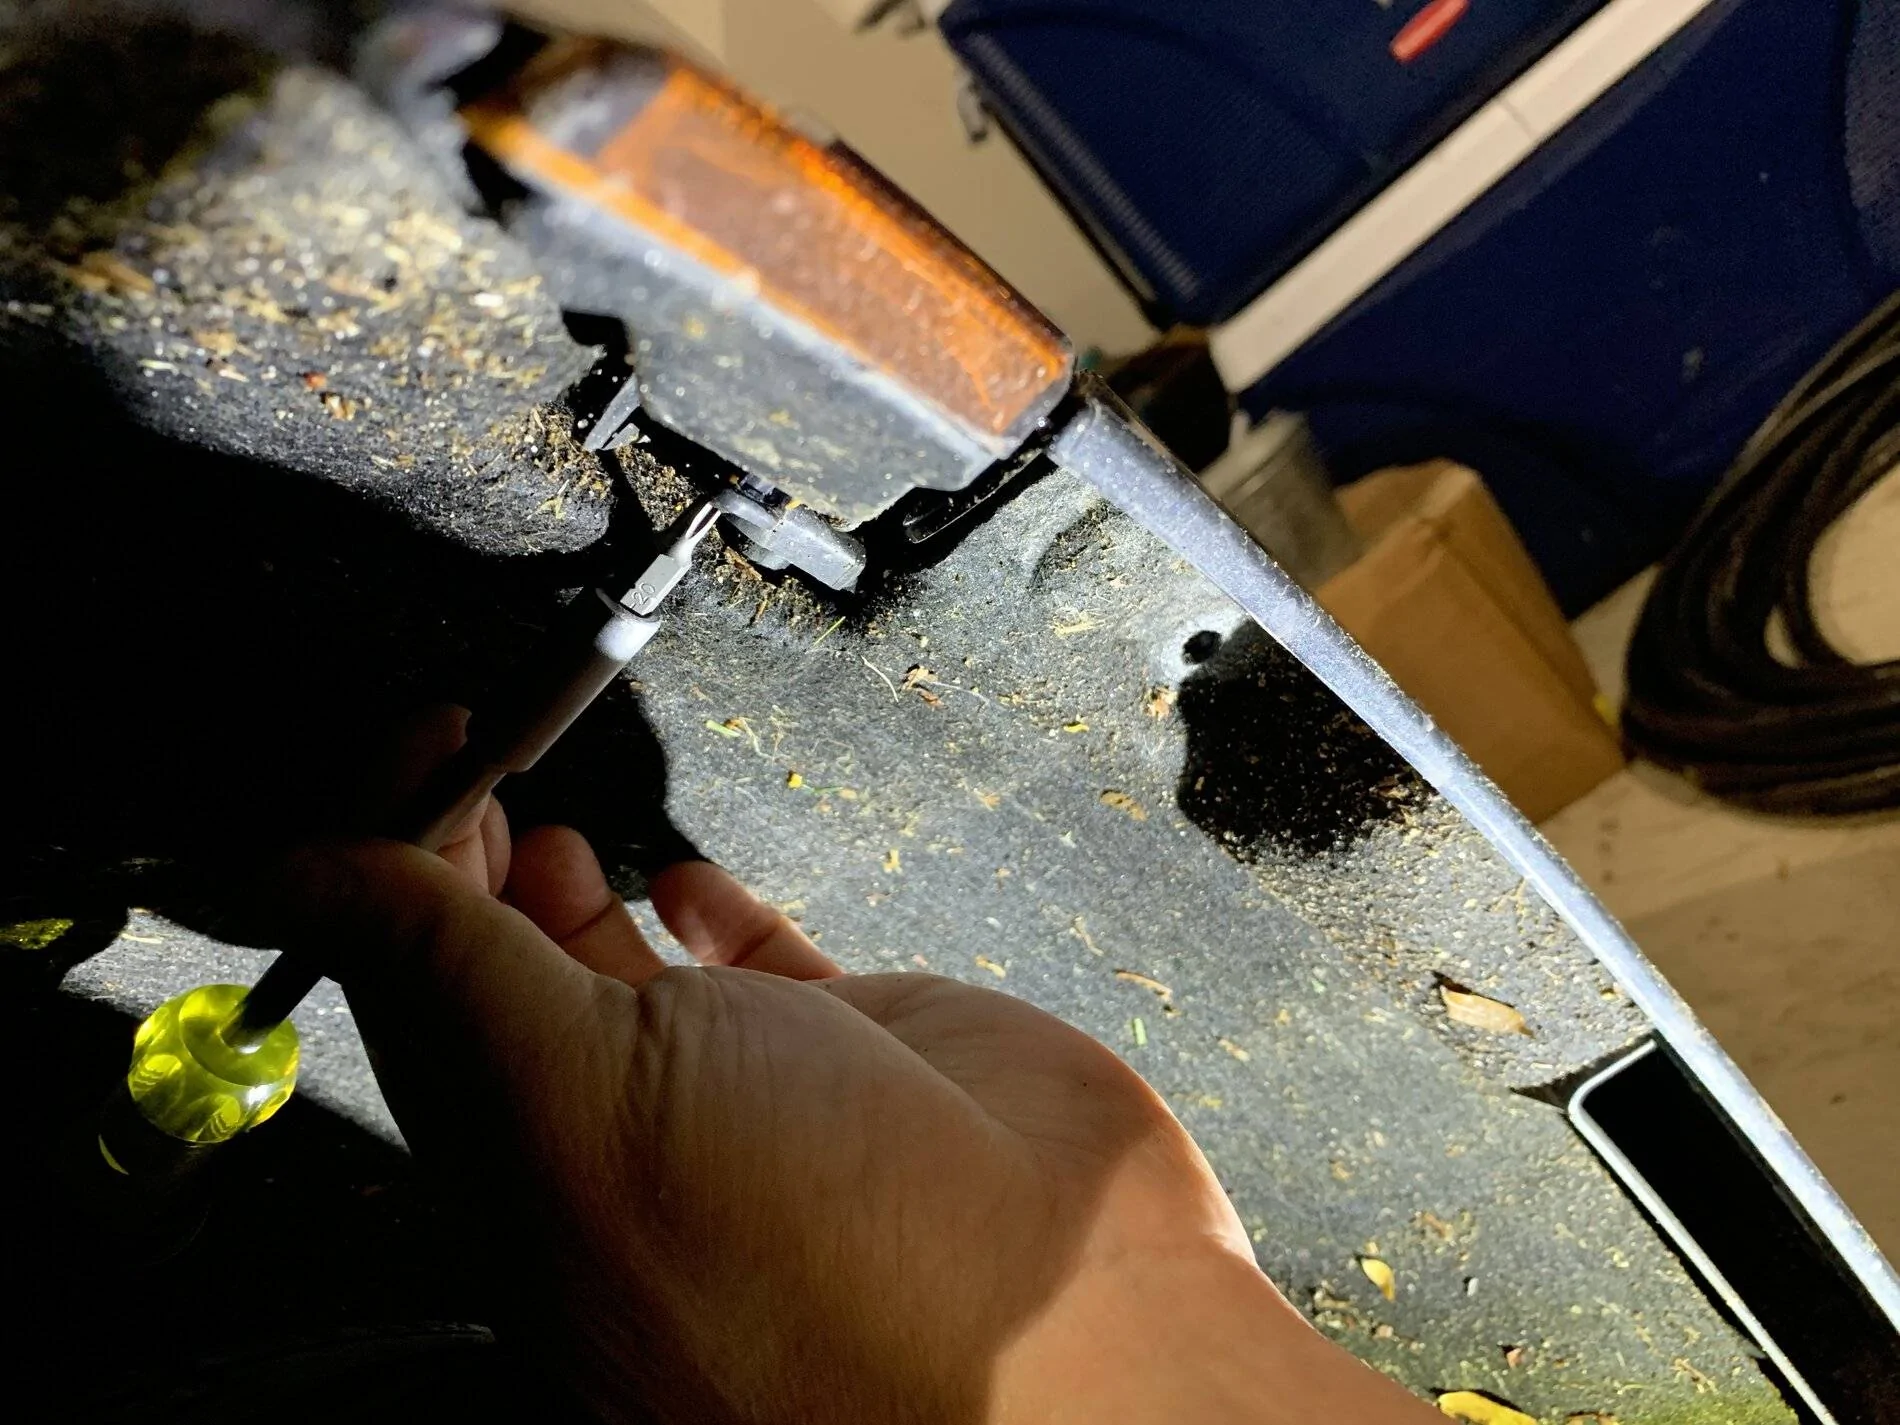
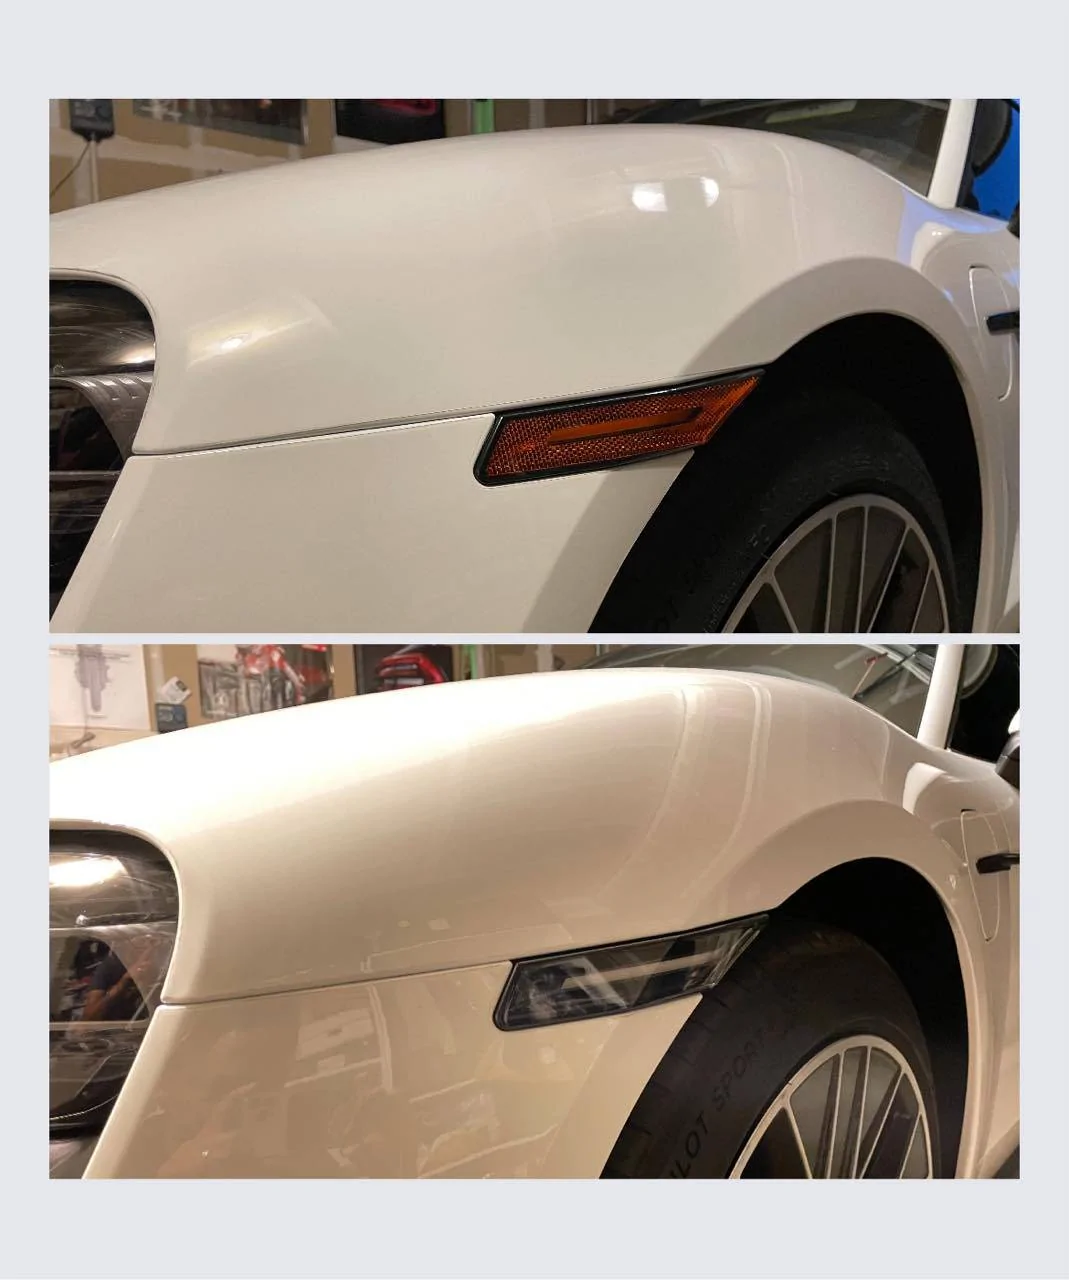
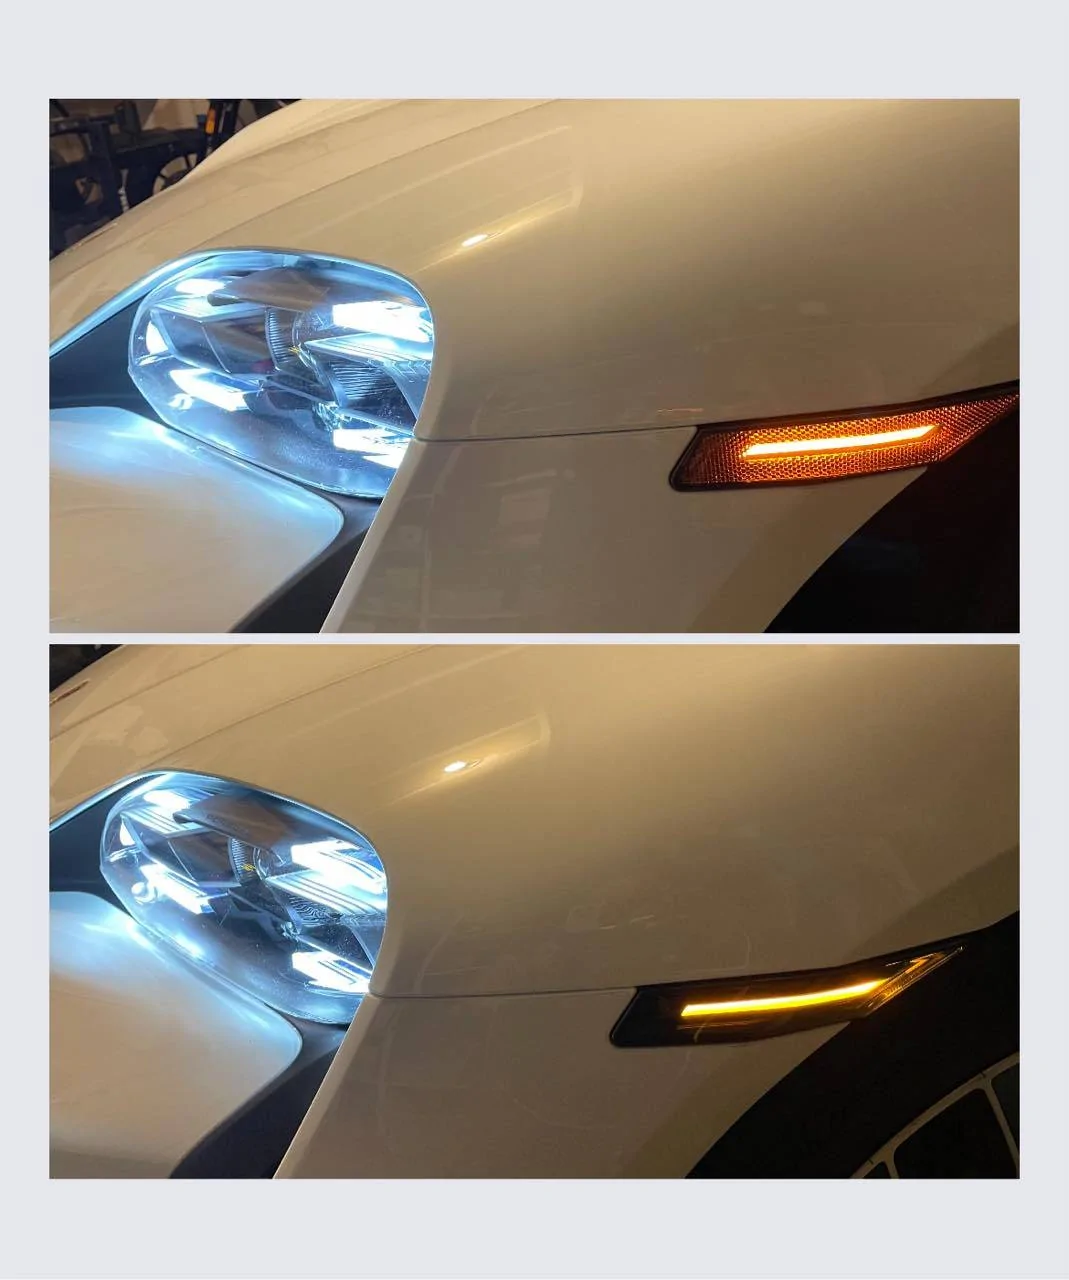
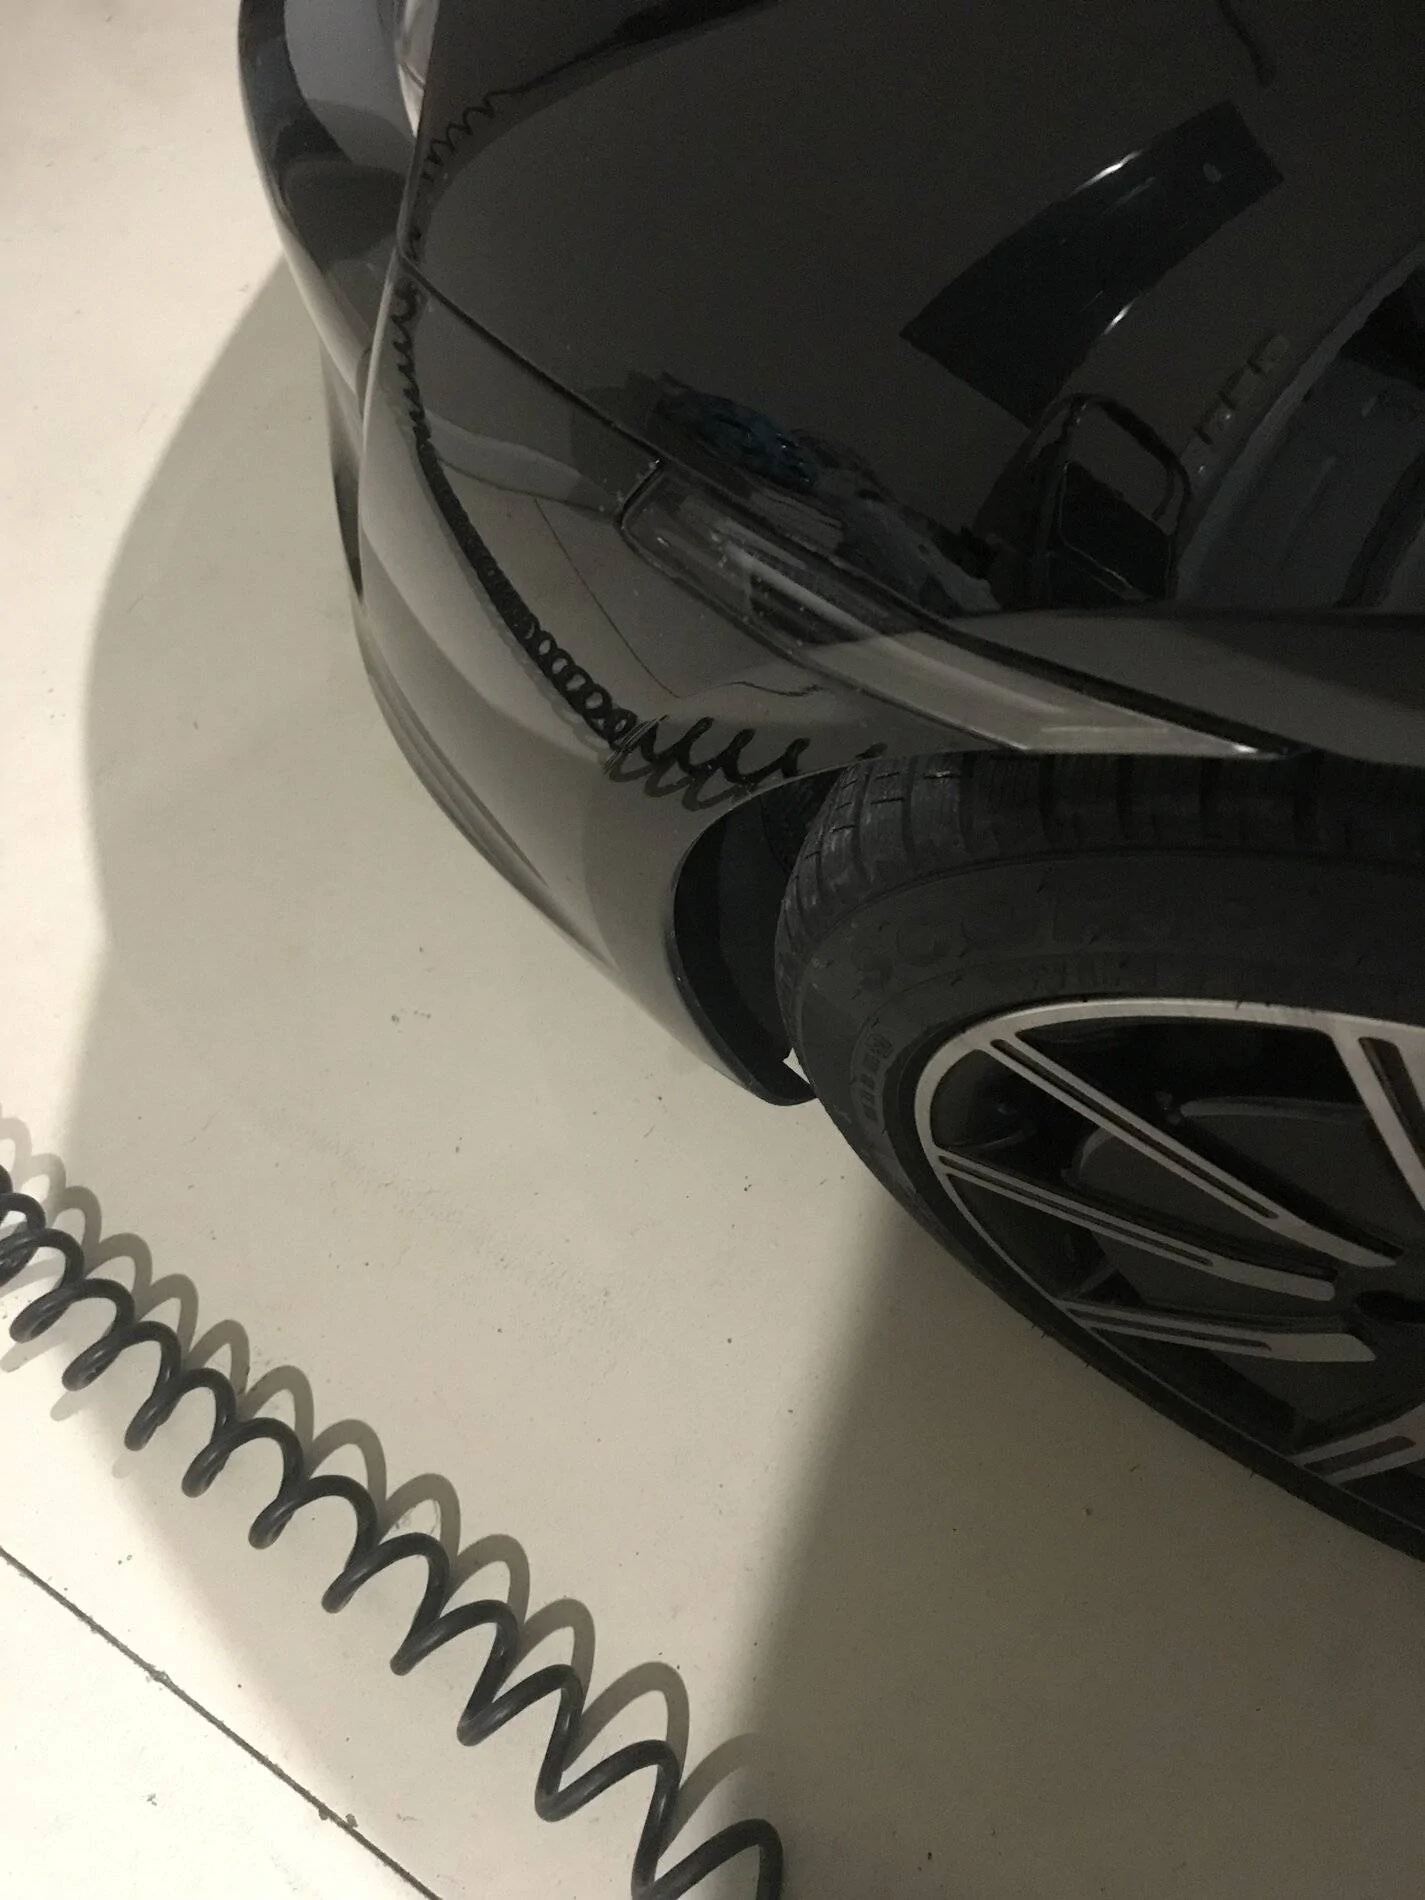
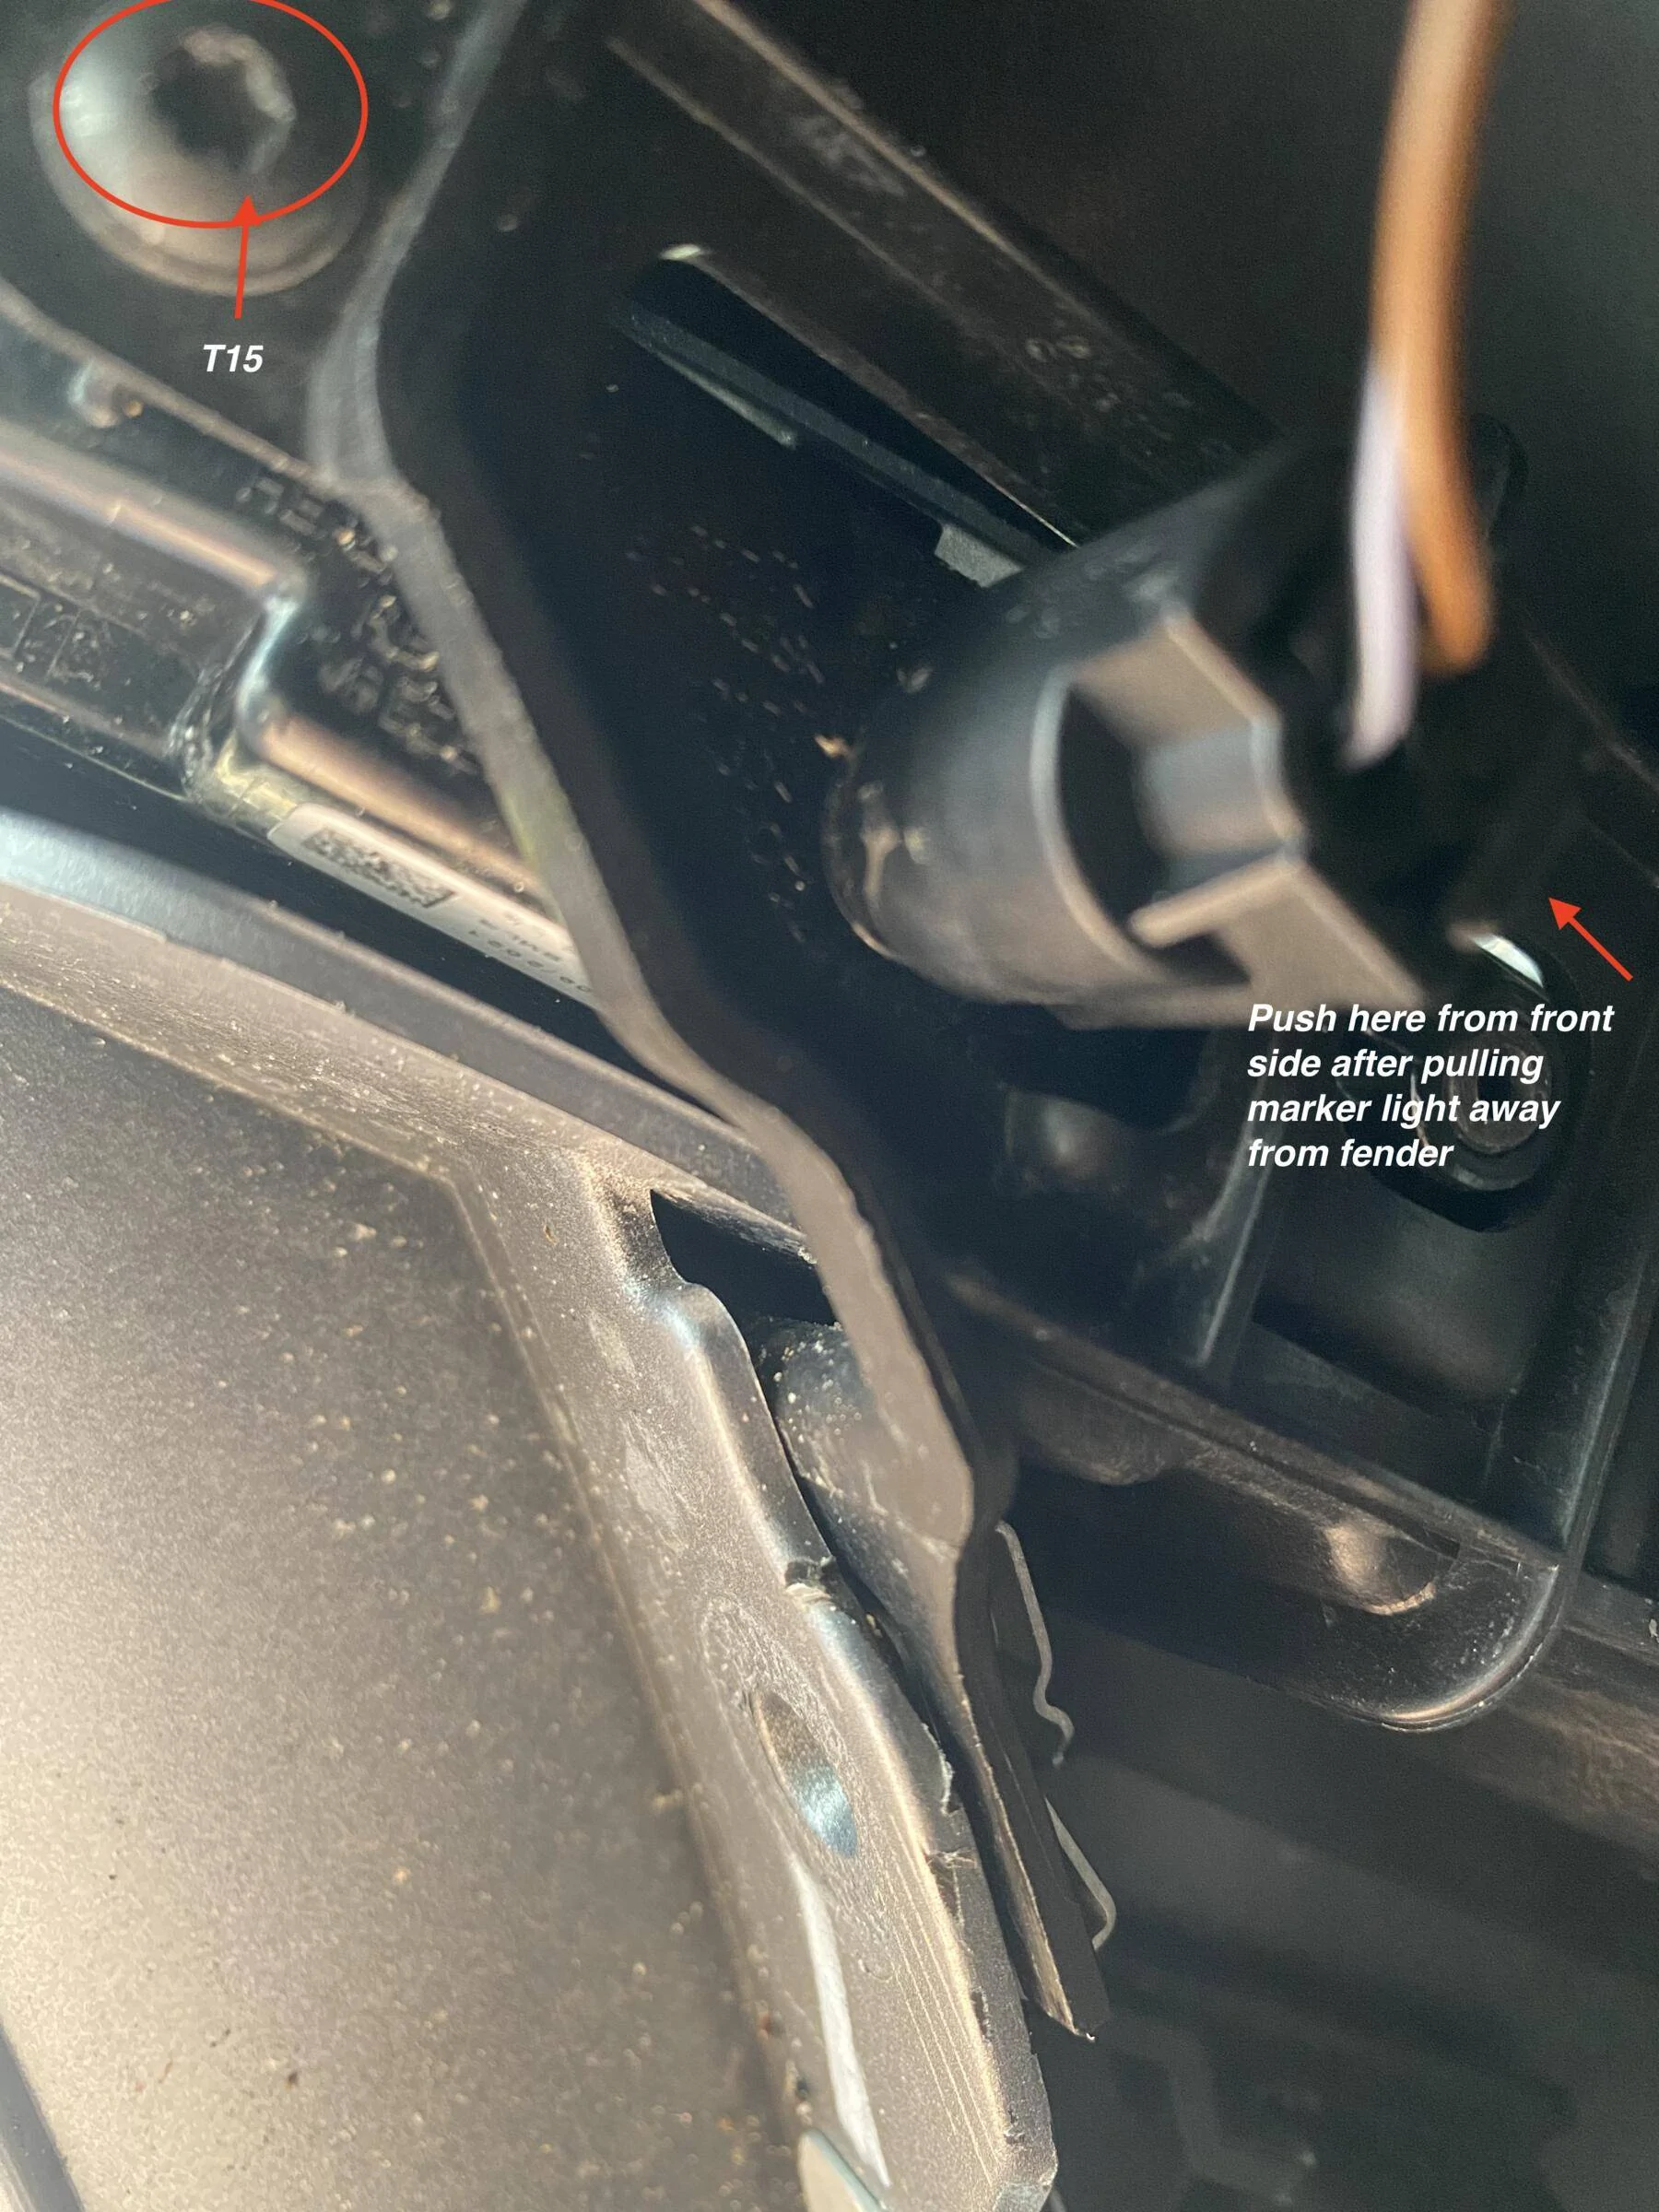
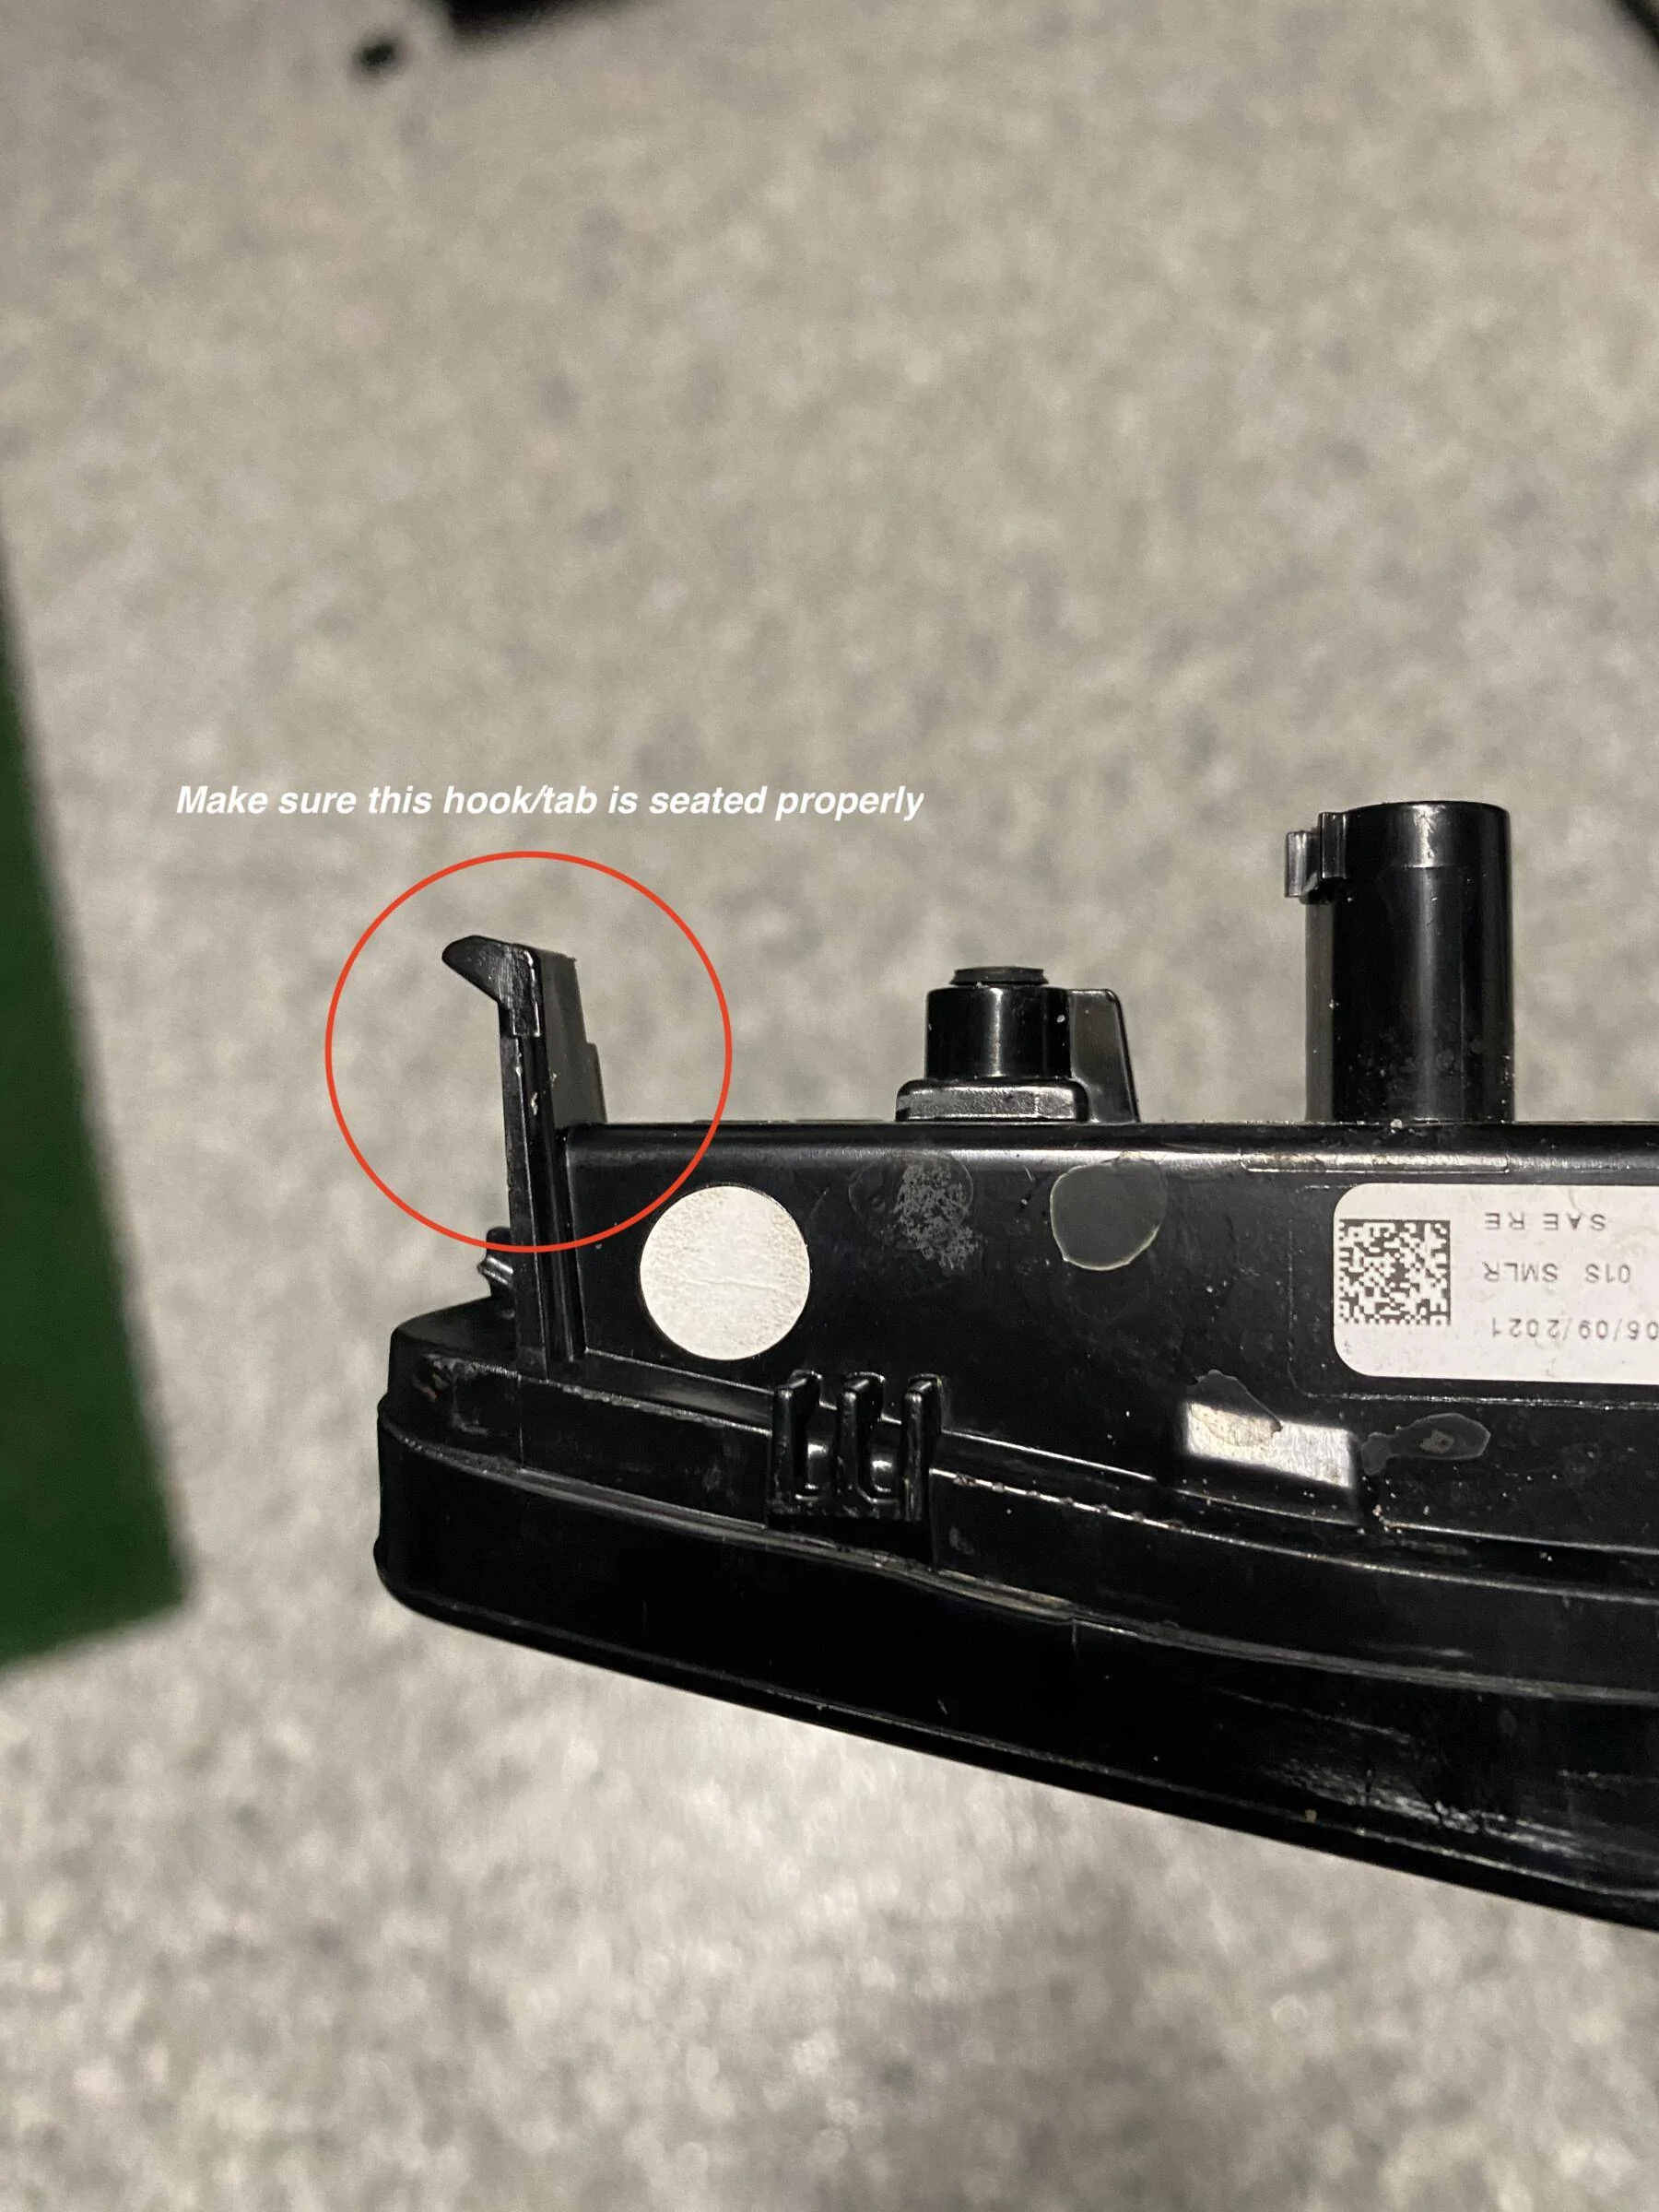
My replacement went surprisingly smoothly - took me maybe 15 minutes on the first side without any prior knowledge. Second side even quicker. Can confirm that it's a T20. I think the hardest part was getting a good hold of the electrical connector to put pressure to unclip.
Sponsored


nycebo

Well-Known Member
First Name
Edward
Joined
Mar 29, 2021
Threads
1
Messages
102
Reaction score
80
Location
New York, NY
Vehicles
Porsche Taycan GTS, Mercedes E450 Wagon
Country flag
T20. I was using it on a screwdriver style handle, making it hard to keep a straight angle. Will try a ratchet later today
You're right that it's in an awkward place and thus tough to get it turning. But once you insert the wrench snugly, you should feel comfortable giving it a firm turn.

A word of repeated advice: when you are reinstalling the new markers, remember to PRE-thread the markers before you set them in place. The markers' holes aren't threaded and very tough to get started from that above-mentioned awkward angle.
 

fullmetalbaal

Well-Known Member
Joined
May 23, 2021
Threads
9
Messages
421
Reaction score
502
Location
Seattle
Vehicles
Taycan 4S
Country flag
You're right that it's in an awkward place and thus tough to get it turning. But once you insert the wrench snugly, you should feel comfortable giving it a firm turn.

A word of repeated advice: when you are reinstalling the new markers, remember to PRE-thread the markers before you set them in place. The markers' holes aren't threaded and very tough to get started from that above-mentioned awkward angle.
Alright, finally I can report success. The metal of the screws Porsche uses for this is unfortunately quite soft and easy to strip if your angle is even a bit off. I managed to get better traction with a new T20 bit and by applying a lot of pressure to the ratchet and holding against it from the outside.

The bit about the release tab being at the front was invaluable, I tried just squeezing the connector from above and below and that didn't do anything. Once I saw the post about the tab being upfront, squeezing there made disconnecting this super easy.

Now I just need to figure out how to get them to sit flush.
Mine sit flush in front and the stick out 1/16 of an inch or so at the back end. Fortunately/unfortunately on both sides and by almost an identical amount. I'm wondering whether this is just something I'll have to live with.
 

wemct

Well-Known Member
Joined
Nov 20, 2019
Threads
20
Messages
732
Reaction score
1,258
Location
Georgia, USA
Vehicles
'23 Cayenne S Coupe; '22 AMG SL55; Taycan 4S(sold)
Country flag
Many others report not being completely flush. The most important thing is that the new side markers don’t wiggle. If they feel solid, I wouldn’t mess around too much and risk a stripped screw or worse.
 

Tsingtao

Well-Known Member
Joined
Jul 22, 2021
Threads
12
Messages
375
Reaction score
461
Location
US
Vehicles
Toucan RWD
Country flag
Ridiculously easy to do this. Literally one screw.

My originals did not have the clip (that needs to be removed and crazy glued back on) so I didn't need to do anything to the new lights. There was some stuck on foam on the top edge on both sides. I peeled that off and stuck on the new ones but i am sure they are not needed.

A few items from the nice step by step from the other page to make it more obvious. To pull out look at the new one and see how there is a latch at the front end, by tilting out the light it makes it easier to disengage this latch.

IMG_2017.JPG


The tab is easier if you then tilt lens in the other direction. It is circled in yellow and just needs to be pushed in and the light comes out easily. If you have taken the one screw out of the tire well, then you can use your other finger to hold other side as you press on it and pull gently out. A good idea is to mentally note how far the plug is in the original light before pulling since I was not sure how far the new light needed to go in.

IMG_2018.JPG
IMG_2019.JPG


Pre-scewing is key to make it easier to mount the new light when it is placed back in place. Be sure to re-engage the front tab as this may be why some people do not have flush light.. Literally 5 minutes per side, done. And it looks amazing...And yes it has been raining a lot and mud on the road on the way to my house. Will be cleaning the car next week!

IMG_2016.JPG
Thanks for these additional pics! I have my clear markers from Suncoast and a T20 (and some duct tape just in case). Now it is time to get rid of the pumpkin effect on my black RWD.


TayFan

Well-Known Member
First Name
Jason
Joined
Aug 28, 2021
Threads
10
Messages
236
Reaction score
171
Location
Northern California
Vehicles
Porsche Taycan 4S, Audi A7, Mercedes ML350
Country flag
I just did mine, super easy! It's literally one screw and I didn't need to mess with the spacers either. DOT sure has the supreme ability to make everything it touches f-ugly and now we have to spend the extra $150 to switch it back. Thanks, DOT.
216867997_10159388492768197_832370256168526947_n.jpg
216411421_10159388498713197_3698191461359068171_n.jpg
207328858_10159388501123197_21766669752534650_n.jpg
what color is your Taycan? looks great!


Tsingtao

Well-Known Member
Joined
Jul 22, 2021
Threads
12
Messages
375
Reaction score
461
Location
US
Vehicles
Toucan RWD
Country flag
Update: had the dealer take a re-look. They adjusted them and now nearly flush. Much improved.
Porsche Taycan Clear Side Markers IMG_9571


I just completed my clear side marker project as well and noticed that they are not perfectly flush. Problem is I did not pay much attention to how the orange lenses looked before removing them so I have nothing to compare them to. Maybe the orange lights were not perfectly flush either. Anybody know if this is about how they should look or do I need to see my friendly Porsche dealer and pay them to fix whatever I did wrong.
 

Henke

Well-Known Member
Joined
Jun 27, 2021
Threads
31
Messages
359
Reaction score
226
Location
California
Vehicles
Taycan 4S
Country flag
Has anyone installed clear side markers on a 2022 Taycan 4s? I messaged suncoast to confirm if they are compatible. My Porsche dealer offered to pop them on for me for free when I pick up the car.
 

TayFan

Well-Known Member
First Name
Jason
Joined
Aug 28, 2021
Threads
10
Messages
236
Reaction score
171
Location
Northern California
Vehicles
Porsche Taycan 4S, Audi A7, Mercedes ML350
Country flag
Has anyone installed clear side markers on a 2022 Taycan 4s? I messaged suncoast to confirm if they are compatible. My Porsche dealer offered to pop them on for me for free when I pick up the car.
Yep had my dealer install them on my ‘22 4S sedan and they look great! Huge improvement IMO. Proper spec (a nod to my friends across the pond). ?
 

Chedman13

Well-Known Member
Joined
Aug 10, 2021
Threads
12
Messages
101
Reaction score
53
Location
Illinois
Vehicles
GL63 Brabus B63 Widestar, Awaiting Taycan Turbo
Country flag
My dealership installed mine prior to delivery and they are not flush either. Looks fine, but definitely not flush. I have PPF over it.
 

02bluesuperroo

Well-Known Member
First Name
Rob
Joined
Aug 25, 2021
Threads
11
Messages
439
Reaction score
240
Location
SE FL
Vehicles
2022 Porsche Taycan 4s
Country flag
I just DIY this on my MY2022. Mine was mid-November build date. There is a very important change to these instructions, at least on my car. The screws that hold the fender liner in are T20 but the screw that holds the side marker light into the car is actually T15 on the MY2022. Took me a little while to figure this out.

On the second side, I didn't even loosen the fender liner. Just remove the T15 screw holding in the side marker light and pull it away from the car as far as the wire on the plug will allow. Then, from the front side of the car, take a small screwdriver and push on the upper part of the tab on the wire clip and apply pressure to pull off the connector while very gently pulling on the side marker light and it will slide right off.

As for the issues with it not sitting flush, there is a little plastic tab on the front of the side marker light and there is a slot in the fender where it slides in. If you don't get that tab seated in the hole in the fender then the light will not sit perfectly flush.

Also wanted to mention that there wasn't any spacer involved on the 2022. Hope this helps someone.


Porsche Taycan Clear Side Markers IMG_7669


Porsche Taycan Clear Side Markers IMG_7675

Porsche Taycan Clear Side Markers IMG_7673
 
Last edited:

tomdfw1

Well-Known Member
First Name
Tom
Joined
Oct 26, 2021
Threads
28
Messages
236
Reaction score
159
Location
Plano
Vehicles
2019 Lamborghini Huracan Performante Spyder
Country flag
I just DIY this on my MY2022. Mine was mid-November build date. There is a very important change to these instructions, at least on my car. The screws that hold the fender liner in are T20 but the screw that holds the side marker light into the car is actually T15 on the MY2022. Took me a little while to figure this out.

On the second side, I didn't even loosen the fender liner. Just remove the T15 screw holding in the side marker light and pull it away from the car as far as the wire on the plug will allow. Then, from the front side of the car, take a small screwdriver and push on the upper part of the tab on the wire clip and apply pressure to pull off the connector while very gently pulling on the side marker light and it will slide right off.

As for the issues with it not sitting flush, there is a little plastic tab on the front of the side marker light and there is a slot in the fender where it slides in. If you don't get that tab seated in the hole in the fender then the light will not sit perfectly flush.

Also wanted to mention that there wasn't any spacer involved on the 2022. Hope this helps someone.


IMG_7669.png


IMG_7675.png

IMG_7673.png
Great post. I did mine tonight and here are thoughts / pics.
I didn’t touch fender liner. I used T20 (you mentioned you used t15) screw to take out the one screw that is semi-easily seen exposed inside the wheel well.

I unscrewed the screw and light assembly easily slid out but was still clipped to wiring harness. I used my finger to push the backside of the coupling and it released. It does need to be “released” so don’t pull too hard expecting it to slide off.

Putting new one on was pretty straightforward but challenging I’m that there is such little play in extra wiring to get leverage behind the harness that attaches to the light assembly. After tinkering for 5 minutes it snapped on and then applied the screw.
I did notice the there is some play on the end so probably need to screw tighter. Will do that later as I was running short on time.
Overall took 20 minutes to do both.
 

Attachments

  • Like
Reactions: AV7


Top